> ## Documentation Index
> Fetch the complete documentation index at: https://docs.aion.xyz/llms.txt
> Use this file to discover all available pages before exploring further.
# Deploy vLLM on Kubernetes
This playbook walks you through creating a Kubernetes cluster, installing the NVIDIA GPU Operator and vLLM Application from the Marketplace, connecting to the cluster via KubeConfig, accessing the running workload using kubectl exec, and finally sending a cURL request to the vLLM OpenAI-compatible API to validate inference end-to-end.
### Prereqs (local machine)
* `kubectl` installed
* Your cluster **KubeConfig** downloaded from the K8s Clusters console
## A) Create the Kubernetes Cluster
### Step 1: Start cluster creation
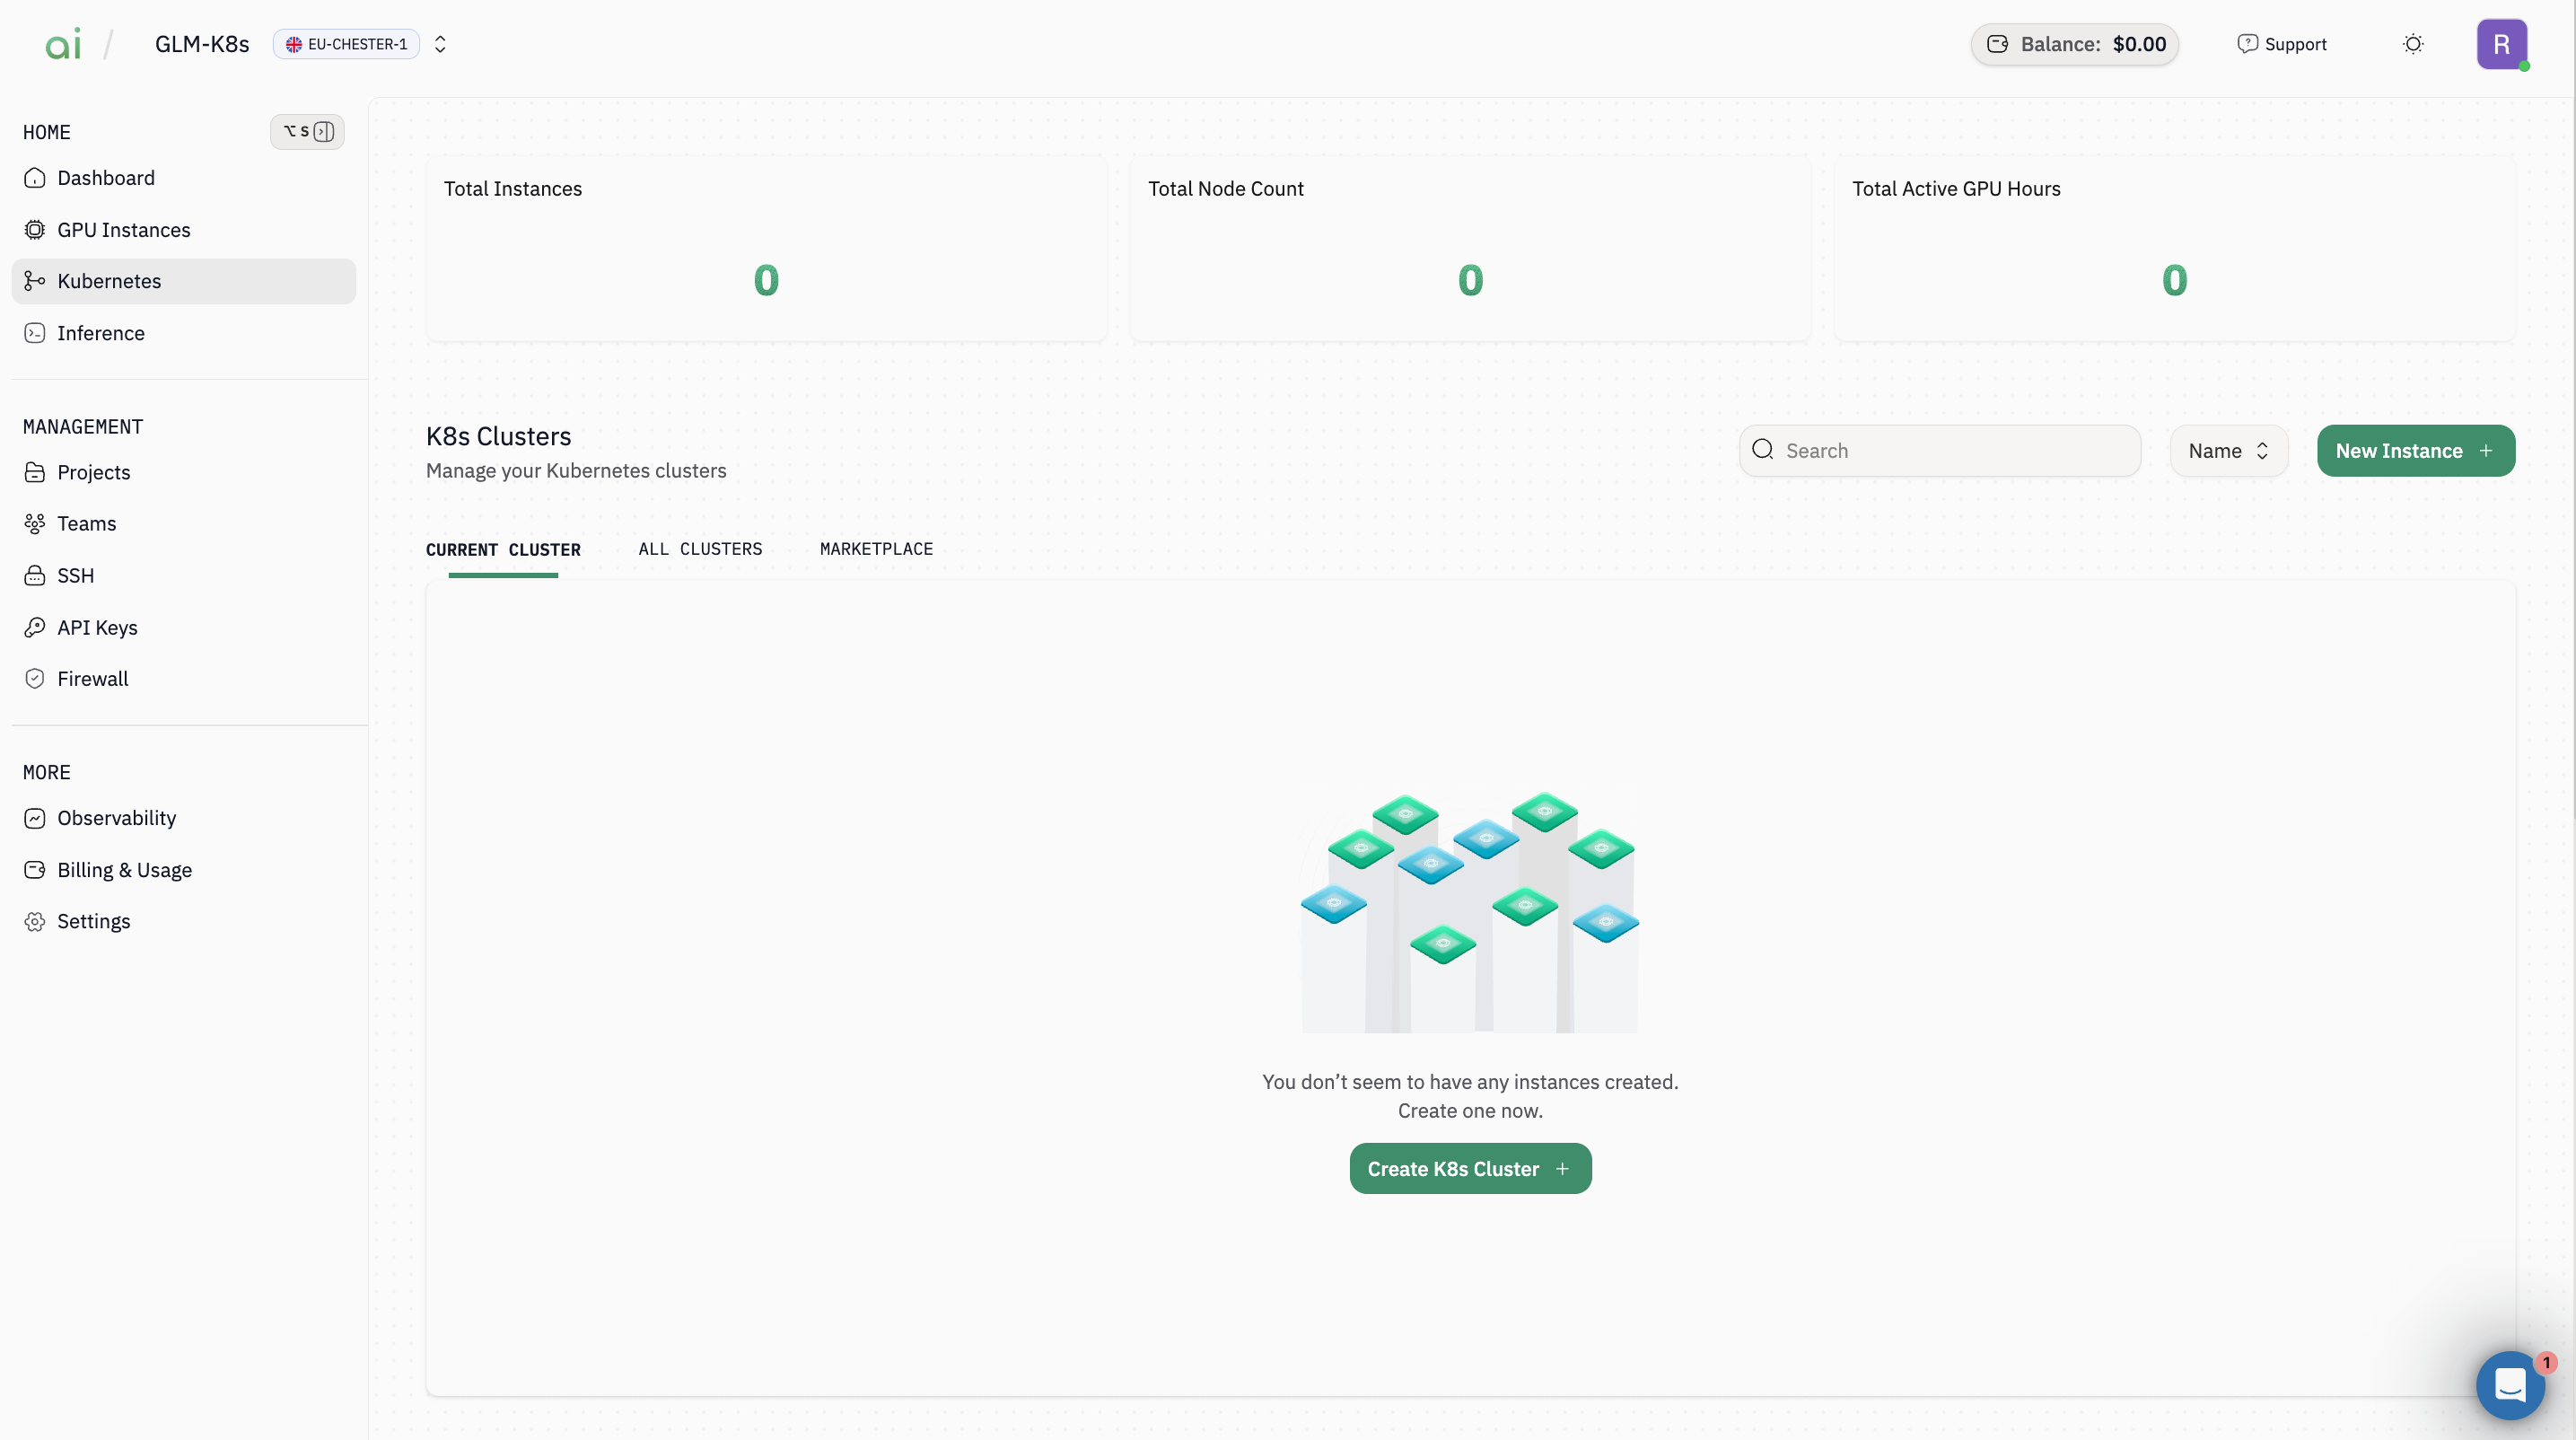
1. In the left sidebar, click **Kubernetes**
2. Click **Create K8s Cluster** (or **New Instance +**)
 ### Step 2: Select region(s)
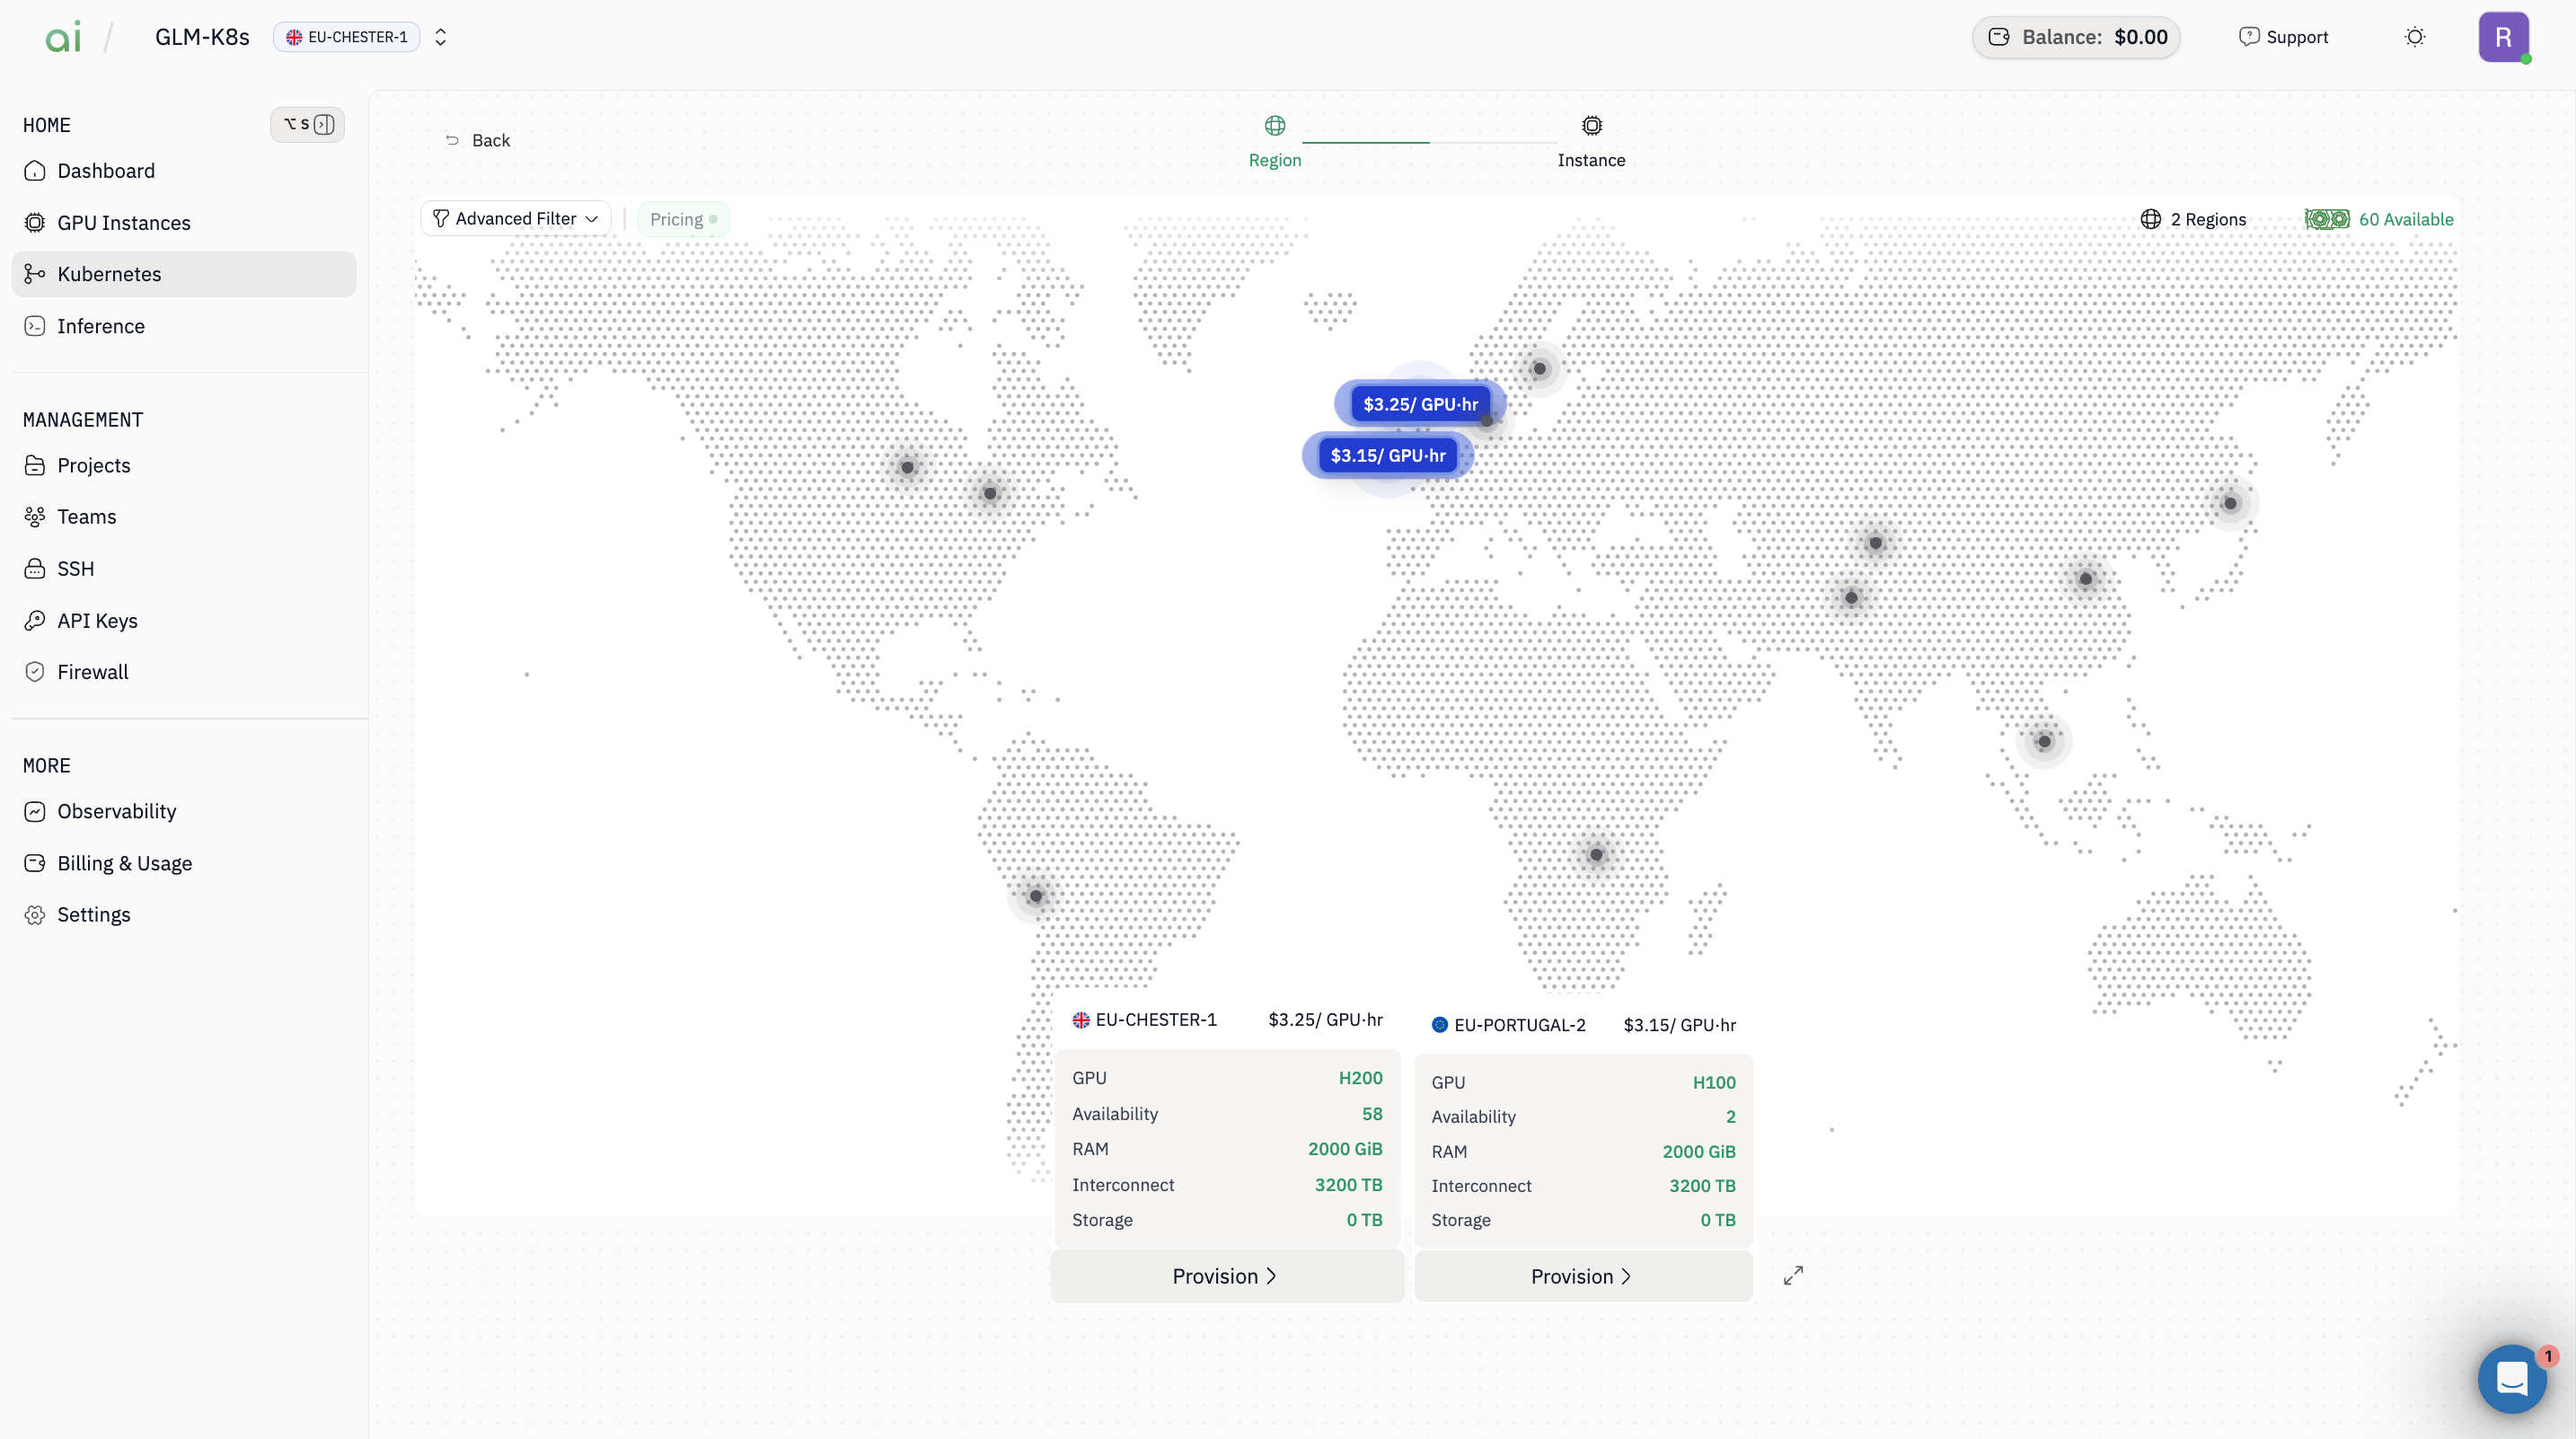
1. On the **Region** map screen, choose the region(s) you want (example: **EU-CHESTER-1**, **EU-PORTUGAL-2**)
2. Continue to the next step
### Step 2: Select region(s)
1. On the **Region** map screen, choose the region(s) you want (example: **EU-CHESTER-1**, **EU-PORTUGAL-2**)
2. Continue to the next step
 ### Step 3: Create / choose a Project
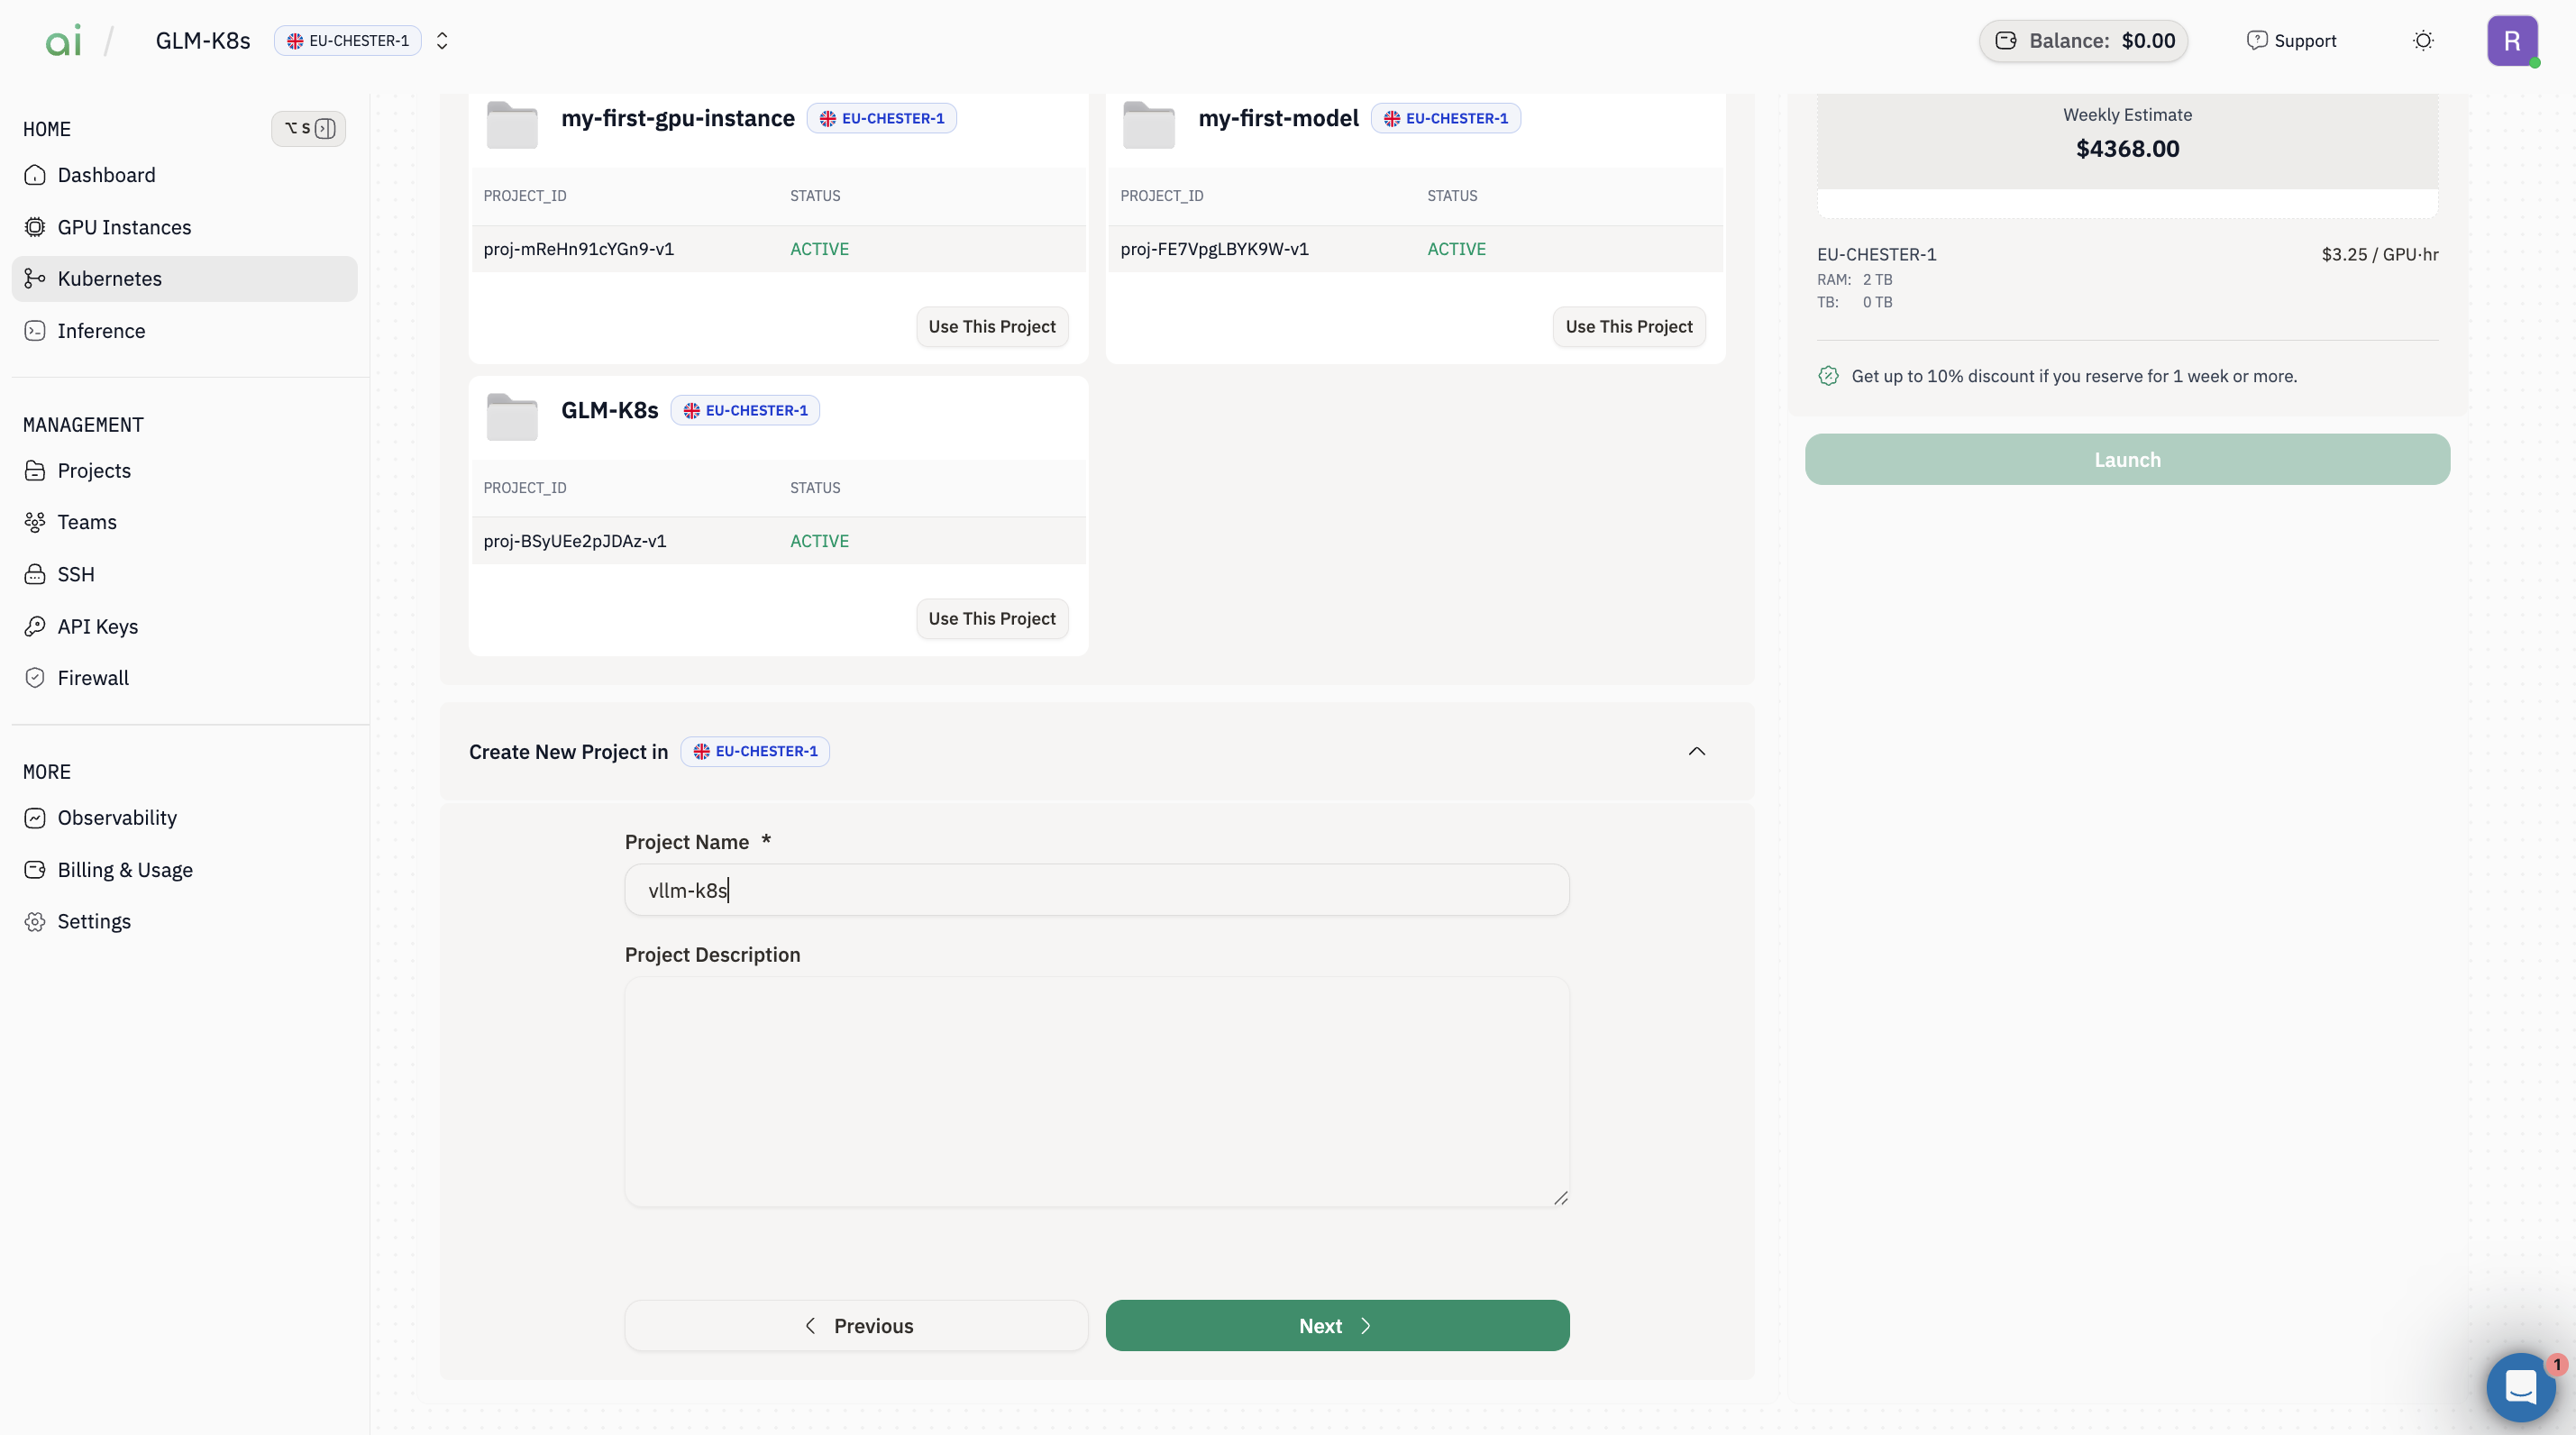
1. In **Project** step, either:
* Select an existing project and click **Use This Project**, or
* Create a new one under **Create New Project**
2. Click **Next**
### Step 3: Create / choose a Project
1. In **Project** step, either:
* Select an existing project and click **Use This Project**, or
* Create a new one under **Create New Project**
2. Click **Next**
 ### Step 4: Configure the cluster
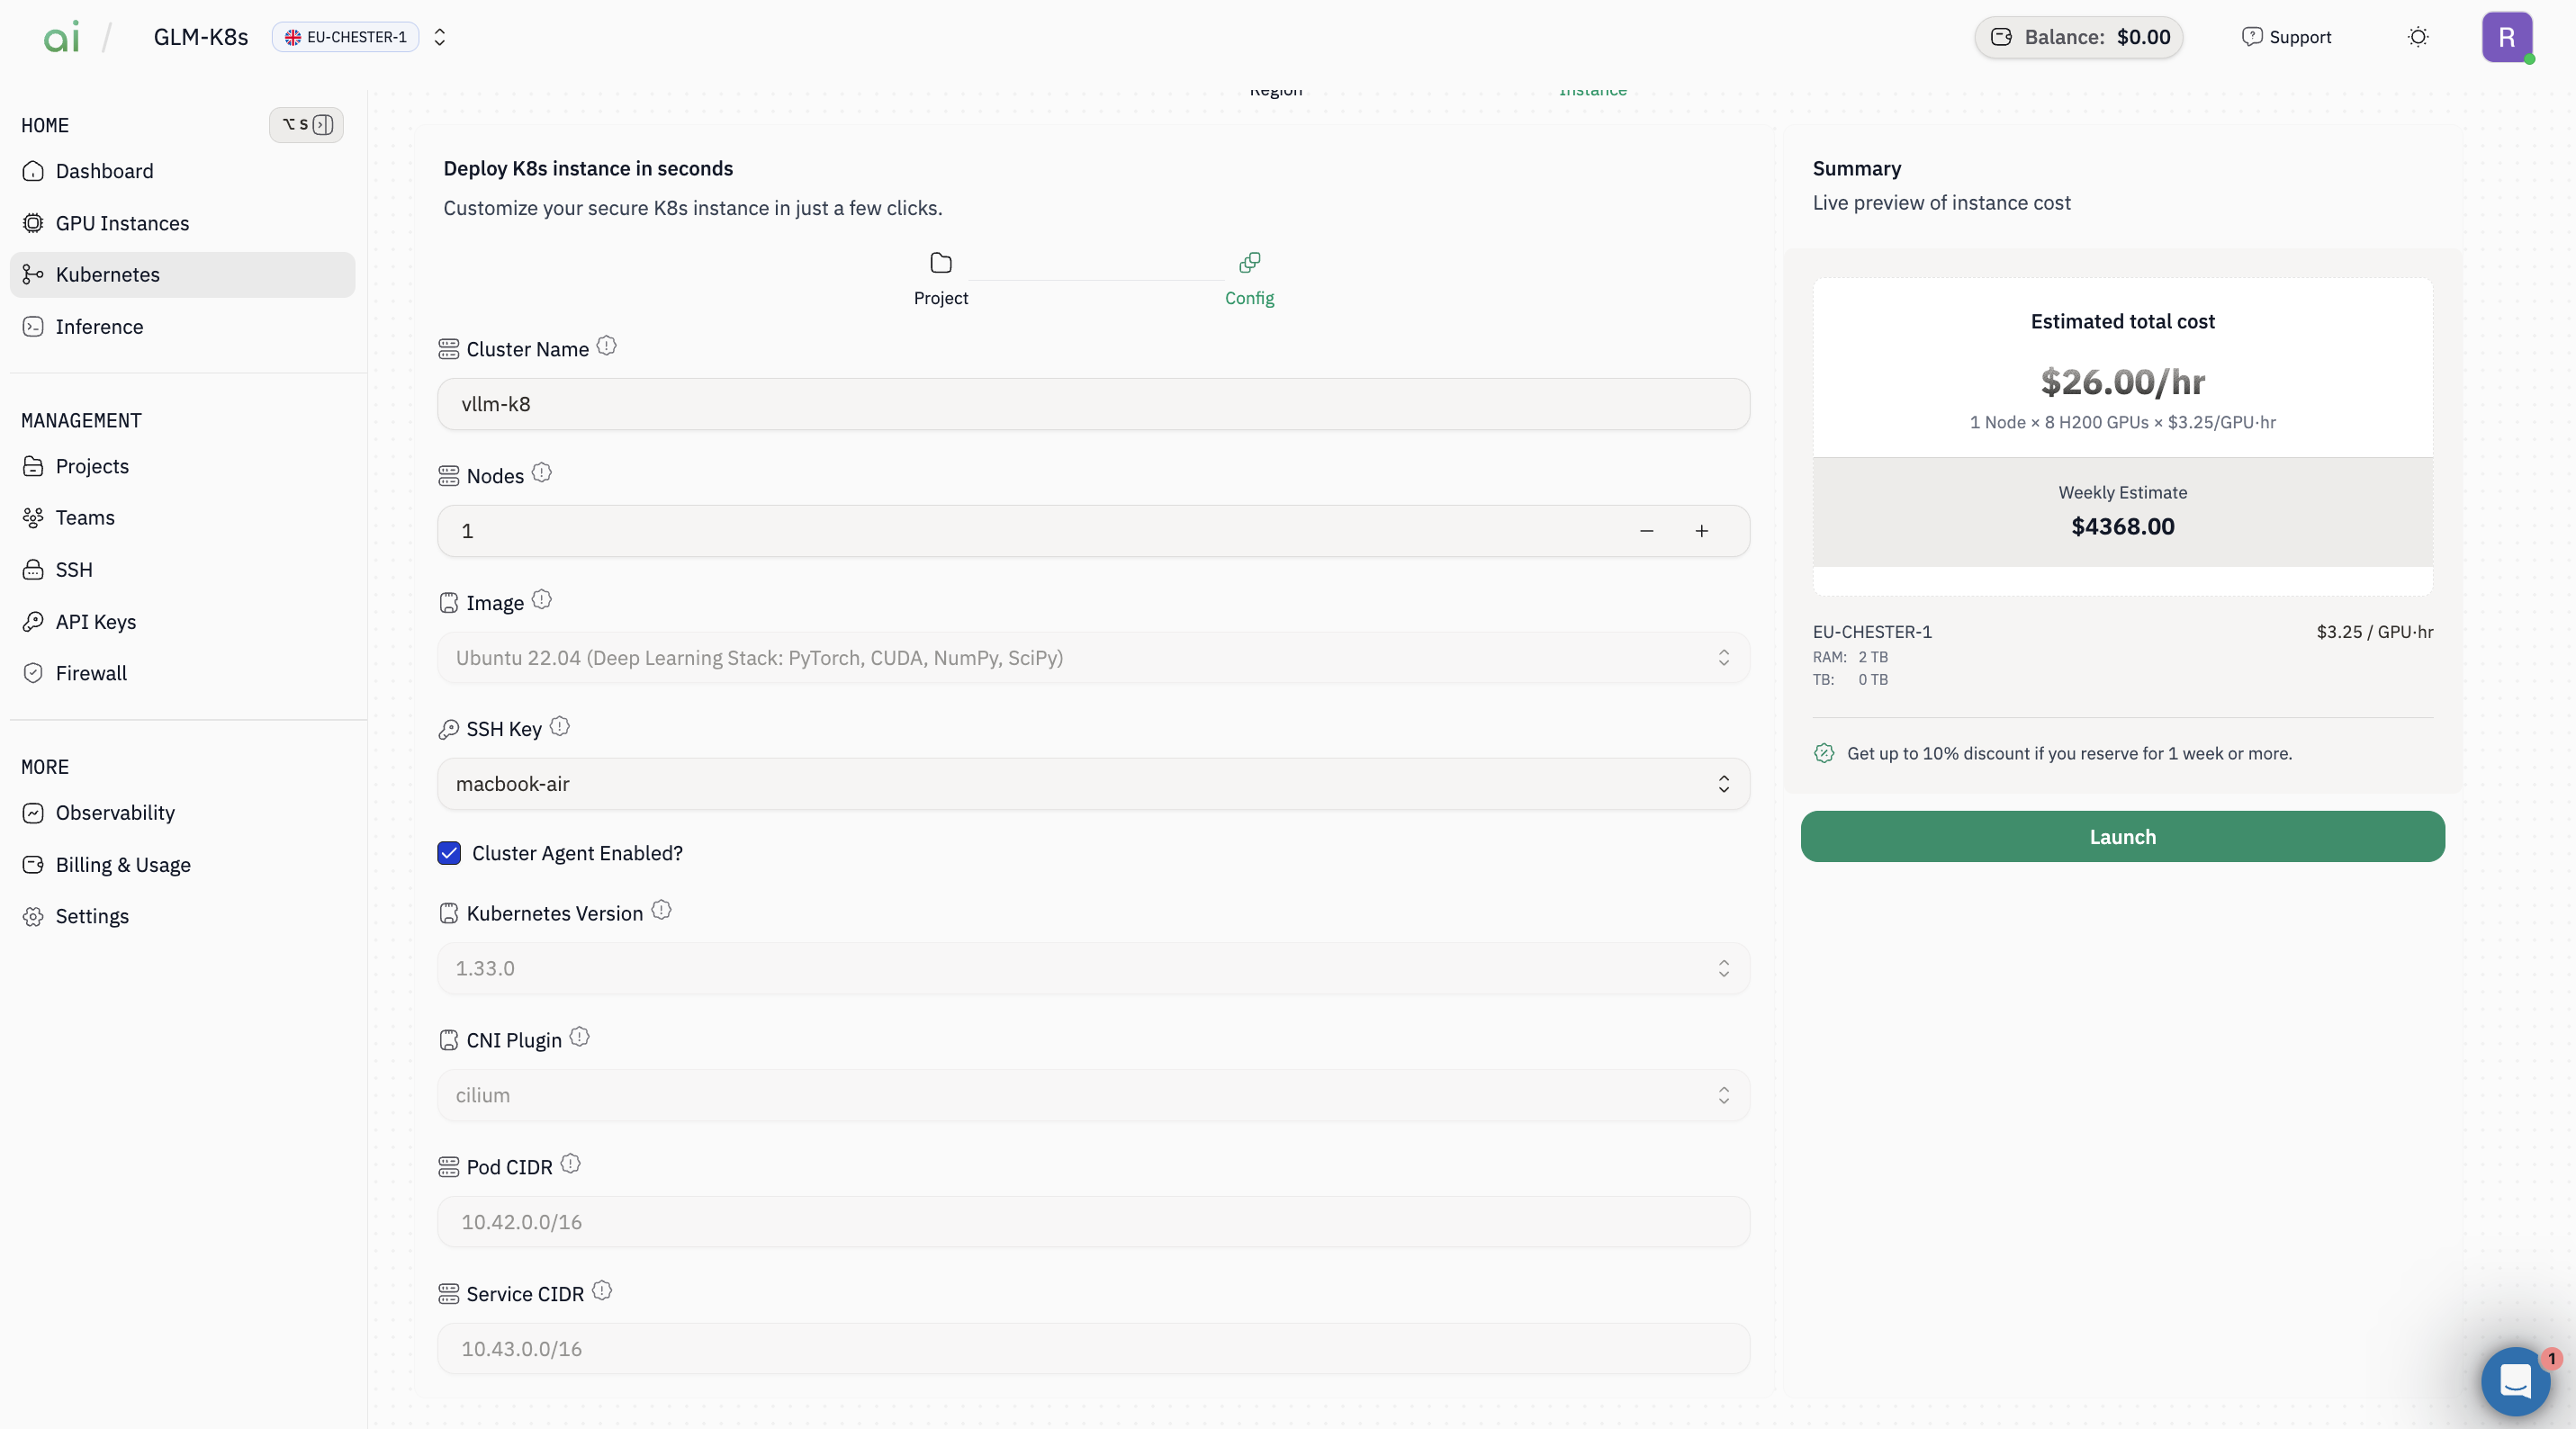
On the **Config** step (cluster config form), set:
* **Cluster Name** (e.g., `vllm-k8`)
* **Nodes** (e.g., `1`)
* **Image** (e.g., *Ubuntu 22.04 Deep Learning Stack*)
* **SSH Key** (select your key)
* (Optional) keep defaults for:
* **Kubernetes Version**
* **CNI Plugin** (e.g., `cilium`)
* \*\*Pod CIDR / Service CIDR\`
* Ensure **Cluster Agent Enabled** is checked (if your setup expects it)
### Step 4: Configure the cluster
On the **Config** step (cluster config form), set:
* **Cluster Name** (e.g., `vllm-k8`)
* **Nodes** (e.g., `1`)
* **Image** (e.g., *Ubuntu 22.04 Deep Learning Stack*)
* **SSH Key** (select your key)
* (Optional) keep defaults for:
* **Kubernetes Version**
* **CNI Plugin** (e.g., `cilium`)
* \*\*Pod CIDR / Service CIDR\`
* Ensure **Cluster Agent Enabled** is checked (if your setup expects it)
 ### Step 5: Launch
1. Review the **Summary** cost panel
2. Click **Launch**
3. Wait until the cluster status becomes ready/active.
## B) Connect with kubectl
### Step 1: Retrieve the Kubeconfig command
Once the cluster is created it will appear in the `Current cluster` section.
1. Open the cluster details from the Current cluster list.
2. Click `KubeConfig` (or the KubeConfig button). A dialog appears containing a command you can run from your workstation to print the admin kubeconfig.
The dialog contains a command resembling:
```bash theme={null}
ssh -o StrictHostKeyChecking=no -i ubuntu@k8s-.groundcontrol-aion.xyz sudo cat /etc/kubernetes/admin.conf
```
Click `Copy command` or copy the command manually.
> `Important:` Use the exact host and user shown in the dialog. Replace `` with the path to your private key on your workstation.
### Step 2: Save the kubeconfig locally and connect with kubectl
Run the SSH command (copied in Step 5) locally and redirect the output to a file to save the admin kubeconfig.
```bash theme={null}
# Replace the key path and host with the values from the UI
ssh -o StrictHostKeyChecking=no -i ~/.ssh/id_rsa ubuntu@k8s-.groundcontrol-aion.xyz 'sudo cat /etc/kubernetes/admin.conf' > ~/kubeconfig.yaml
```
Now use the kubeconfig with `kubectl`:
```bash theme={null}
# Temporarily use the kubeconfig for the current shell
export KUBECONFIG=~/kubeconfig.yaml
kubectl get nodes
# Or reference directly without exporting
kubectl --kubeconfig=~/kubeconfig.yaml get nodes
```
## C) Install Marketplace apps (UI)
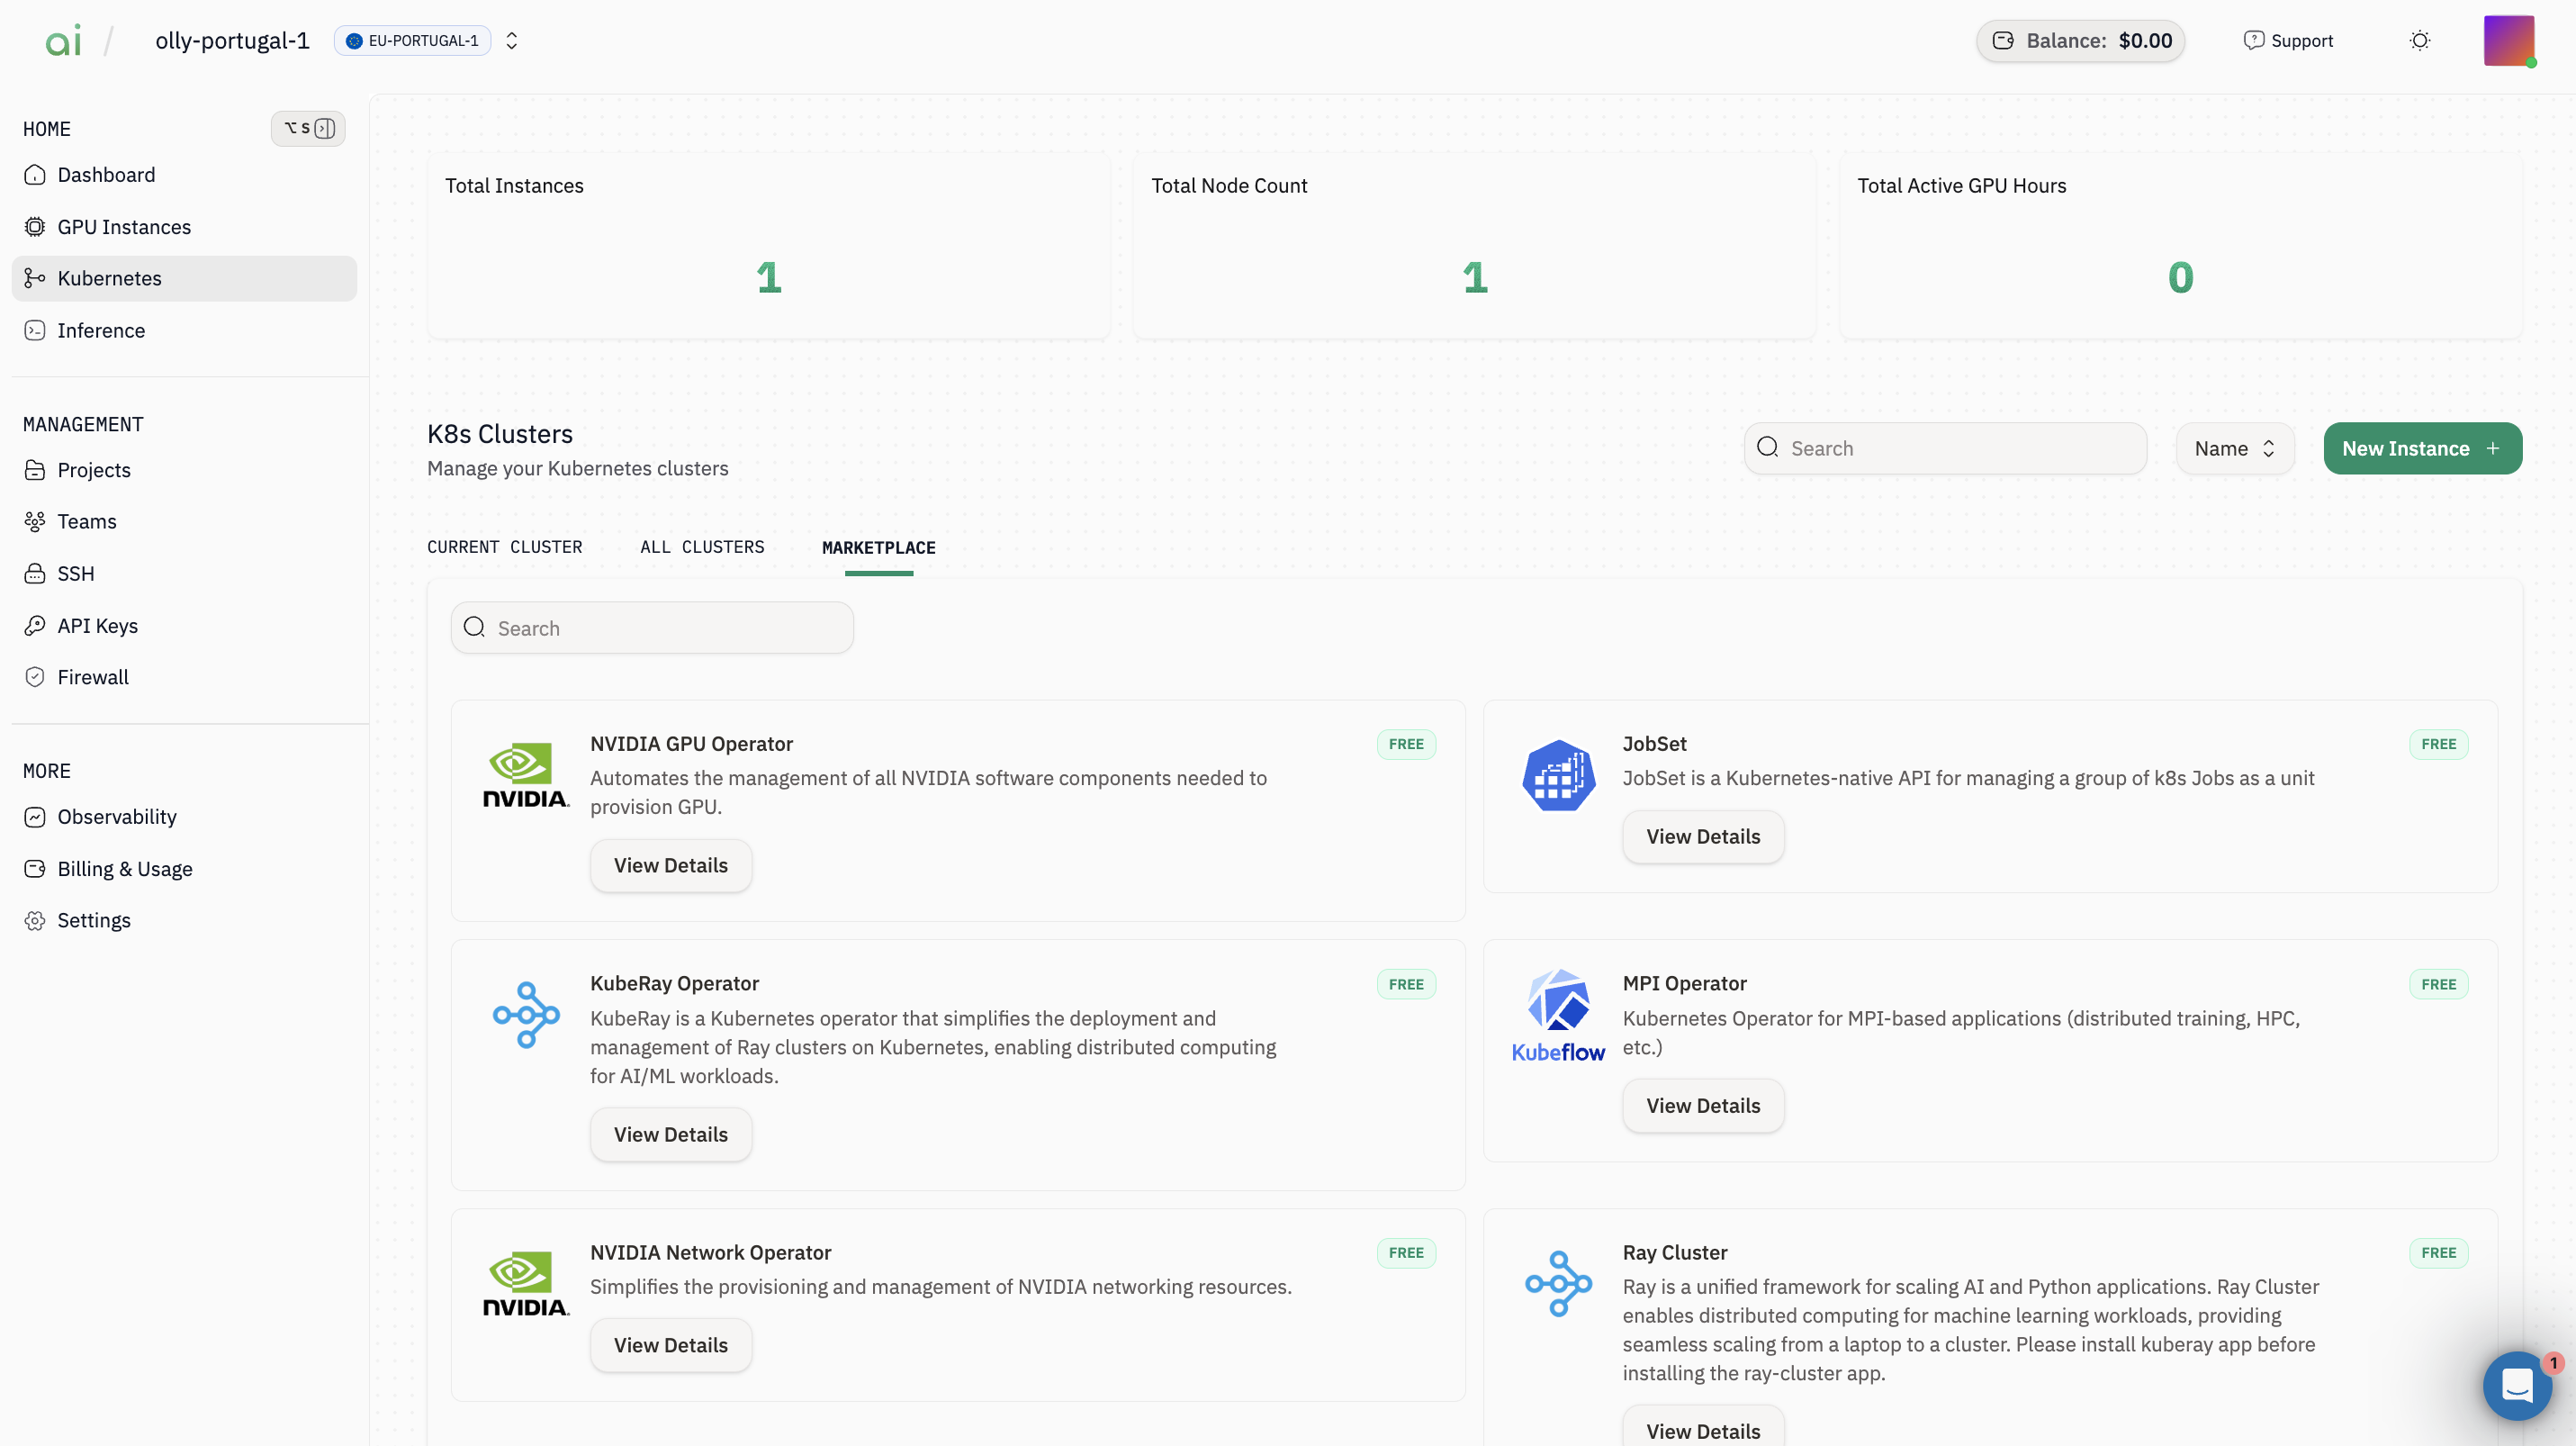
Go to **Kubernetes → Marketplace**.
### Step 5: Launch
1. Review the **Summary** cost panel
2. Click **Launch**
3. Wait until the cluster status becomes ready/active.
## B) Connect with kubectl
### Step 1: Retrieve the Kubeconfig command
Once the cluster is created it will appear in the `Current cluster` section.
1. Open the cluster details from the Current cluster list.
2. Click `KubeConfig` (or the KubeConfig button). A dialog appears containing a command you can run from your workstation to print the admin kubeconfig.
The dialog contains a command resembling:
```bash theme={null}
ssh -o StrictHostKeyChecking=no -i ubuntu@k8s-.groundcontrol-aion.xyz sudo cat /etc/kubernetes/admin.conf
```
Click `Copy command` or copy the command manually.
> `Important:` Use the exact host and user shown in the dialog. Replace `` with the path to your private key on your workstation.
### Step 2: Save the kubeconfig locally and connect with kubectl
Run the SSH command (copied in Step 5) locally and redirect the output to a file to save the admin kubeconfig.
```bash theme={null}
# Replace the key path and host with the values from the UI
ssh -o StrictHostKeyChecking=no -i ~/.ssh/id_rsa ubuntu@k8s-.groundcontrol-aion.xyz 'sudo cat /etc/kubernetes/admin.conf' > ~/kubeconfig.yaml
```
Now use the kubeconfig with `kubectl`:
```bash theme={null}
# Temporarily use the kubeconfig for the current shell
export KUBECONFIG=~/kubeconfig.yaml
kubectl get nodes
# Or reference directly without exporting
kubectl --kubeconfig=~/kubeconfig.yaml get nodes
```
## C) Install Marketplace apps (UI)
Go to **Kubernetes → Marketplace**.
 ### Step 1: Install NVIDIA GPU Operator
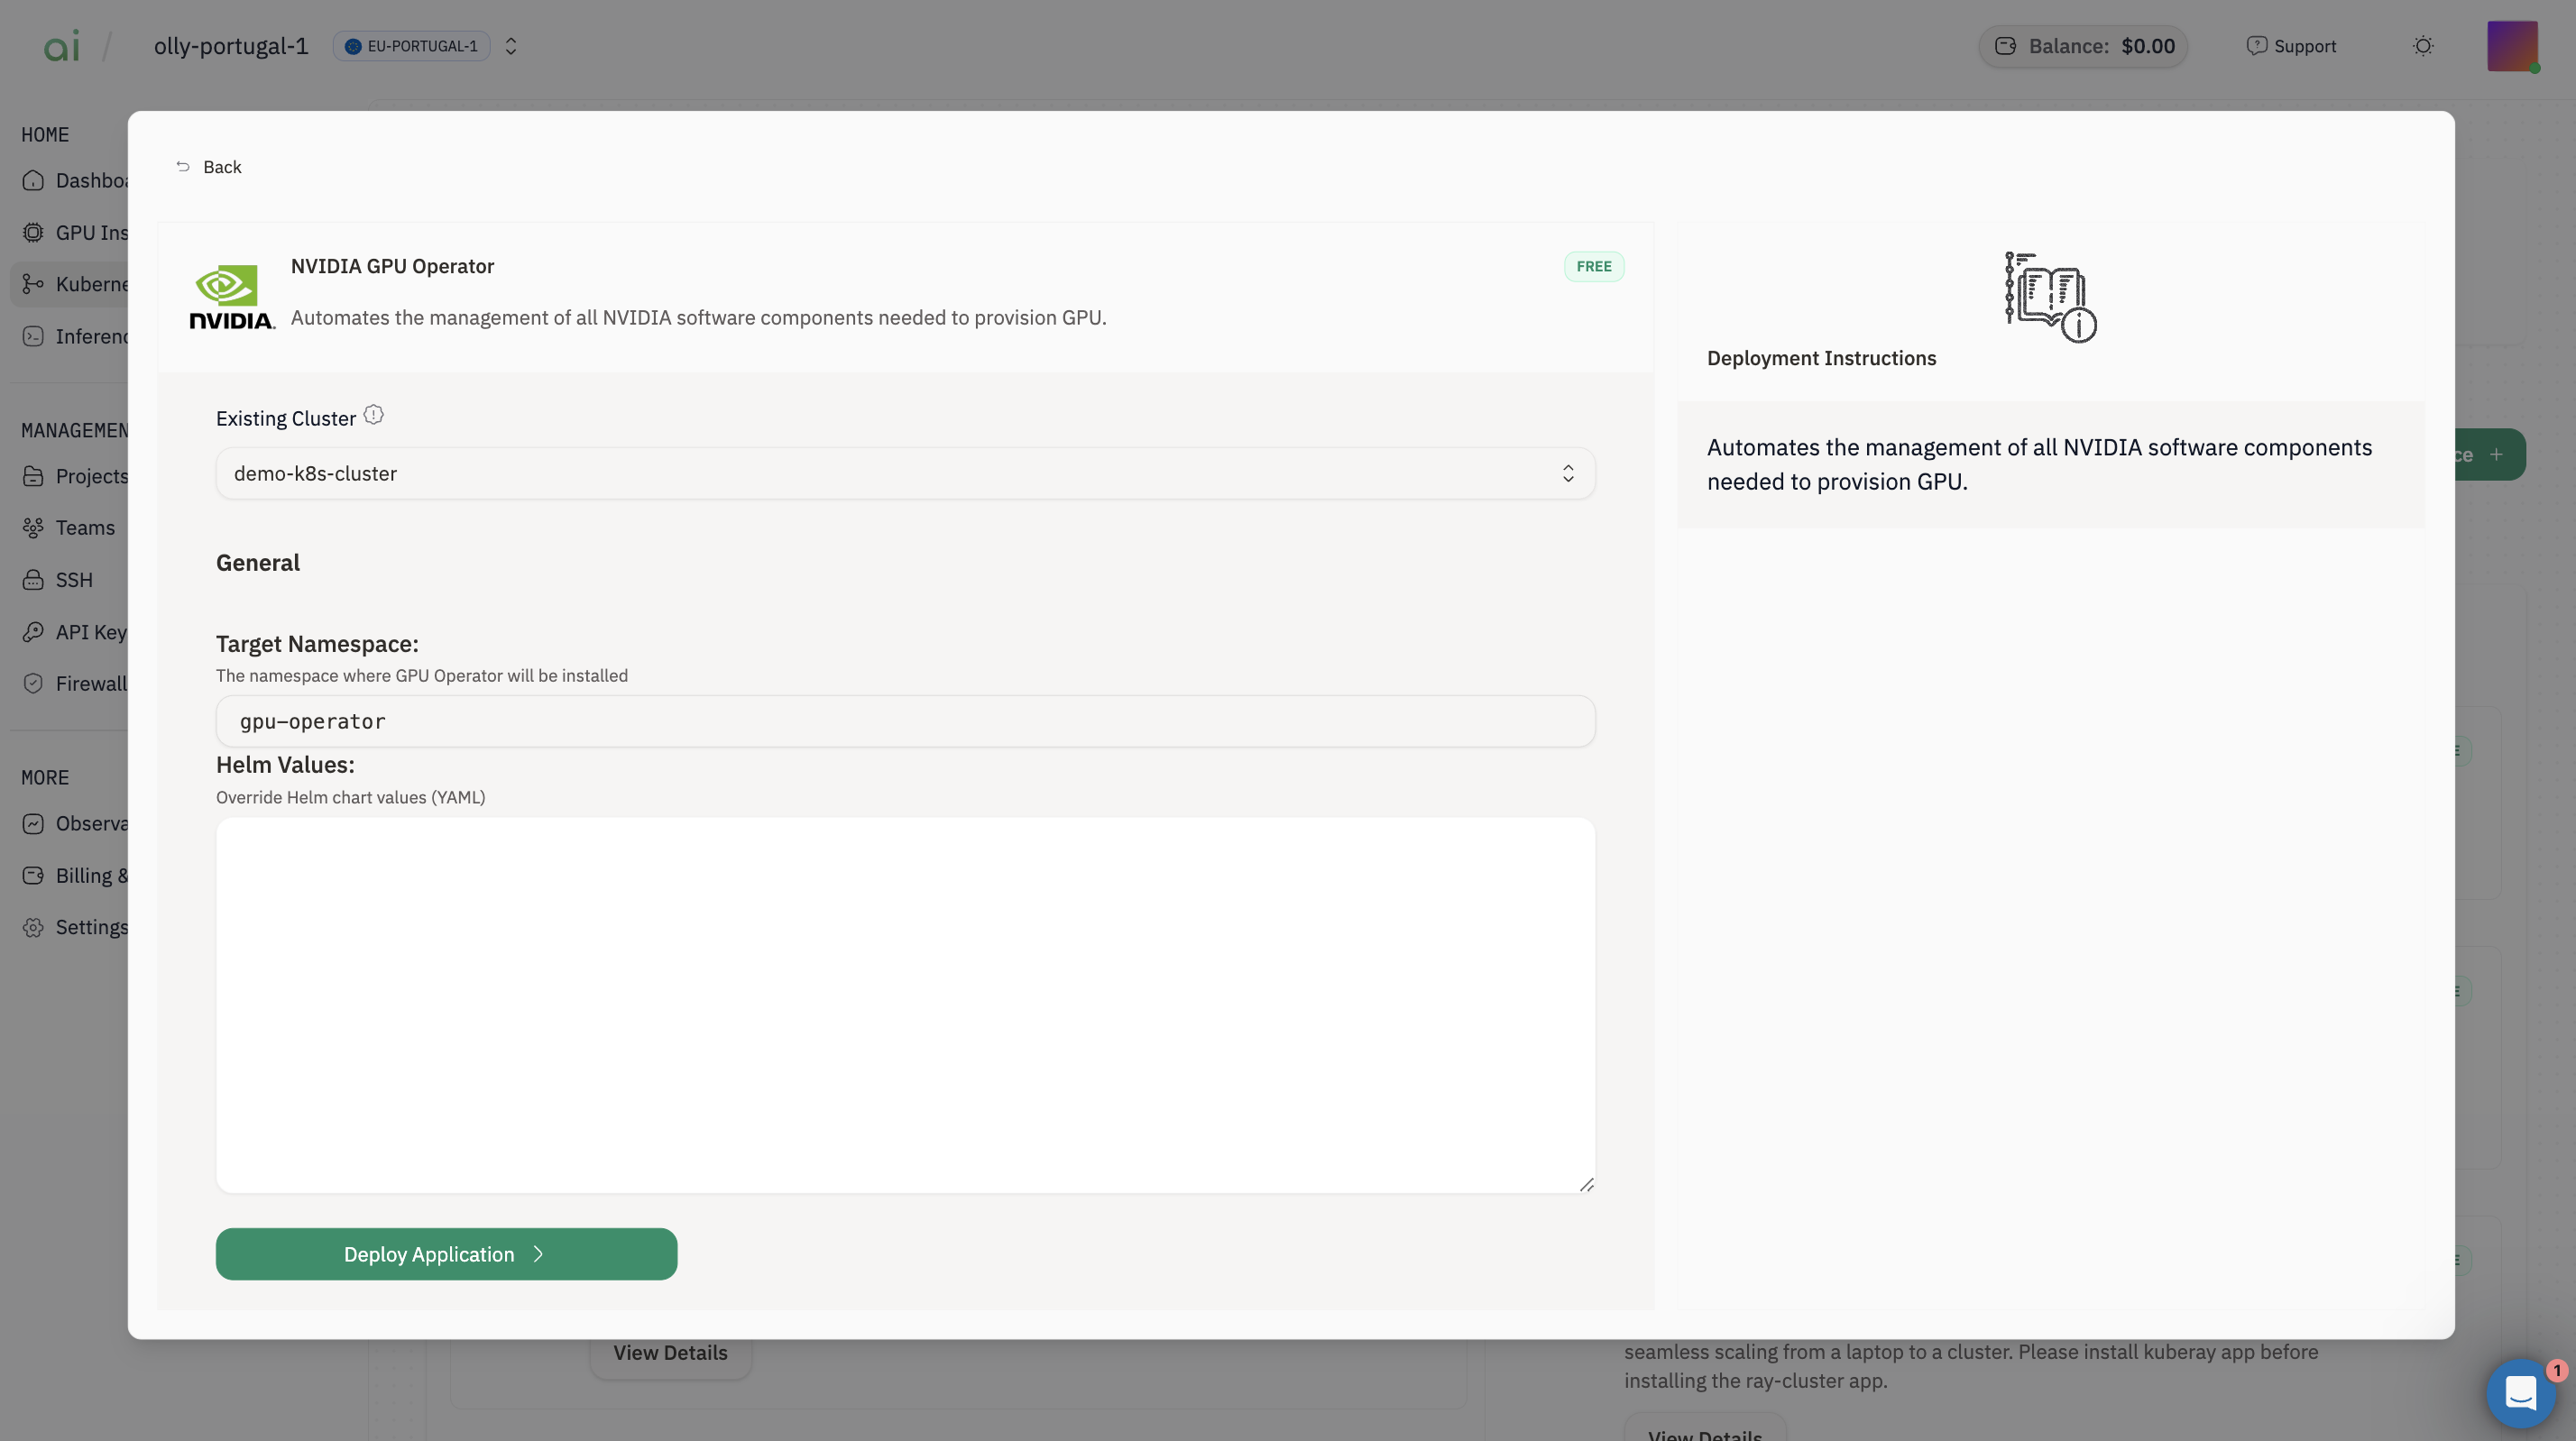
1. Find **NVIDIA GPU Operator** → click **View Details**
2. Select **Existing Cluster** = your cluster (e.g., `vllm-k8`)
3. Leave **Target Namespace** as default (often `gpu-operator`)
4. Click **Deploy Application**
### Step 1: Install NVIDIA GPU Operator
1. Find **NVIDIA GPU Operator** → click **View Details**
2. Select **Existing Cluster** = your cluster (e.g., `vllm-k8`)
3. Leave **Target Namespace** as default (often `gpu-operator`)
4. Click **Deploy Application**
 **Verify (terminal):**
```bash theme={null}
kubectl get pods -n gpu-operator
kubectl get nodes -o wide
```
### Step 2: Install vLLM Application
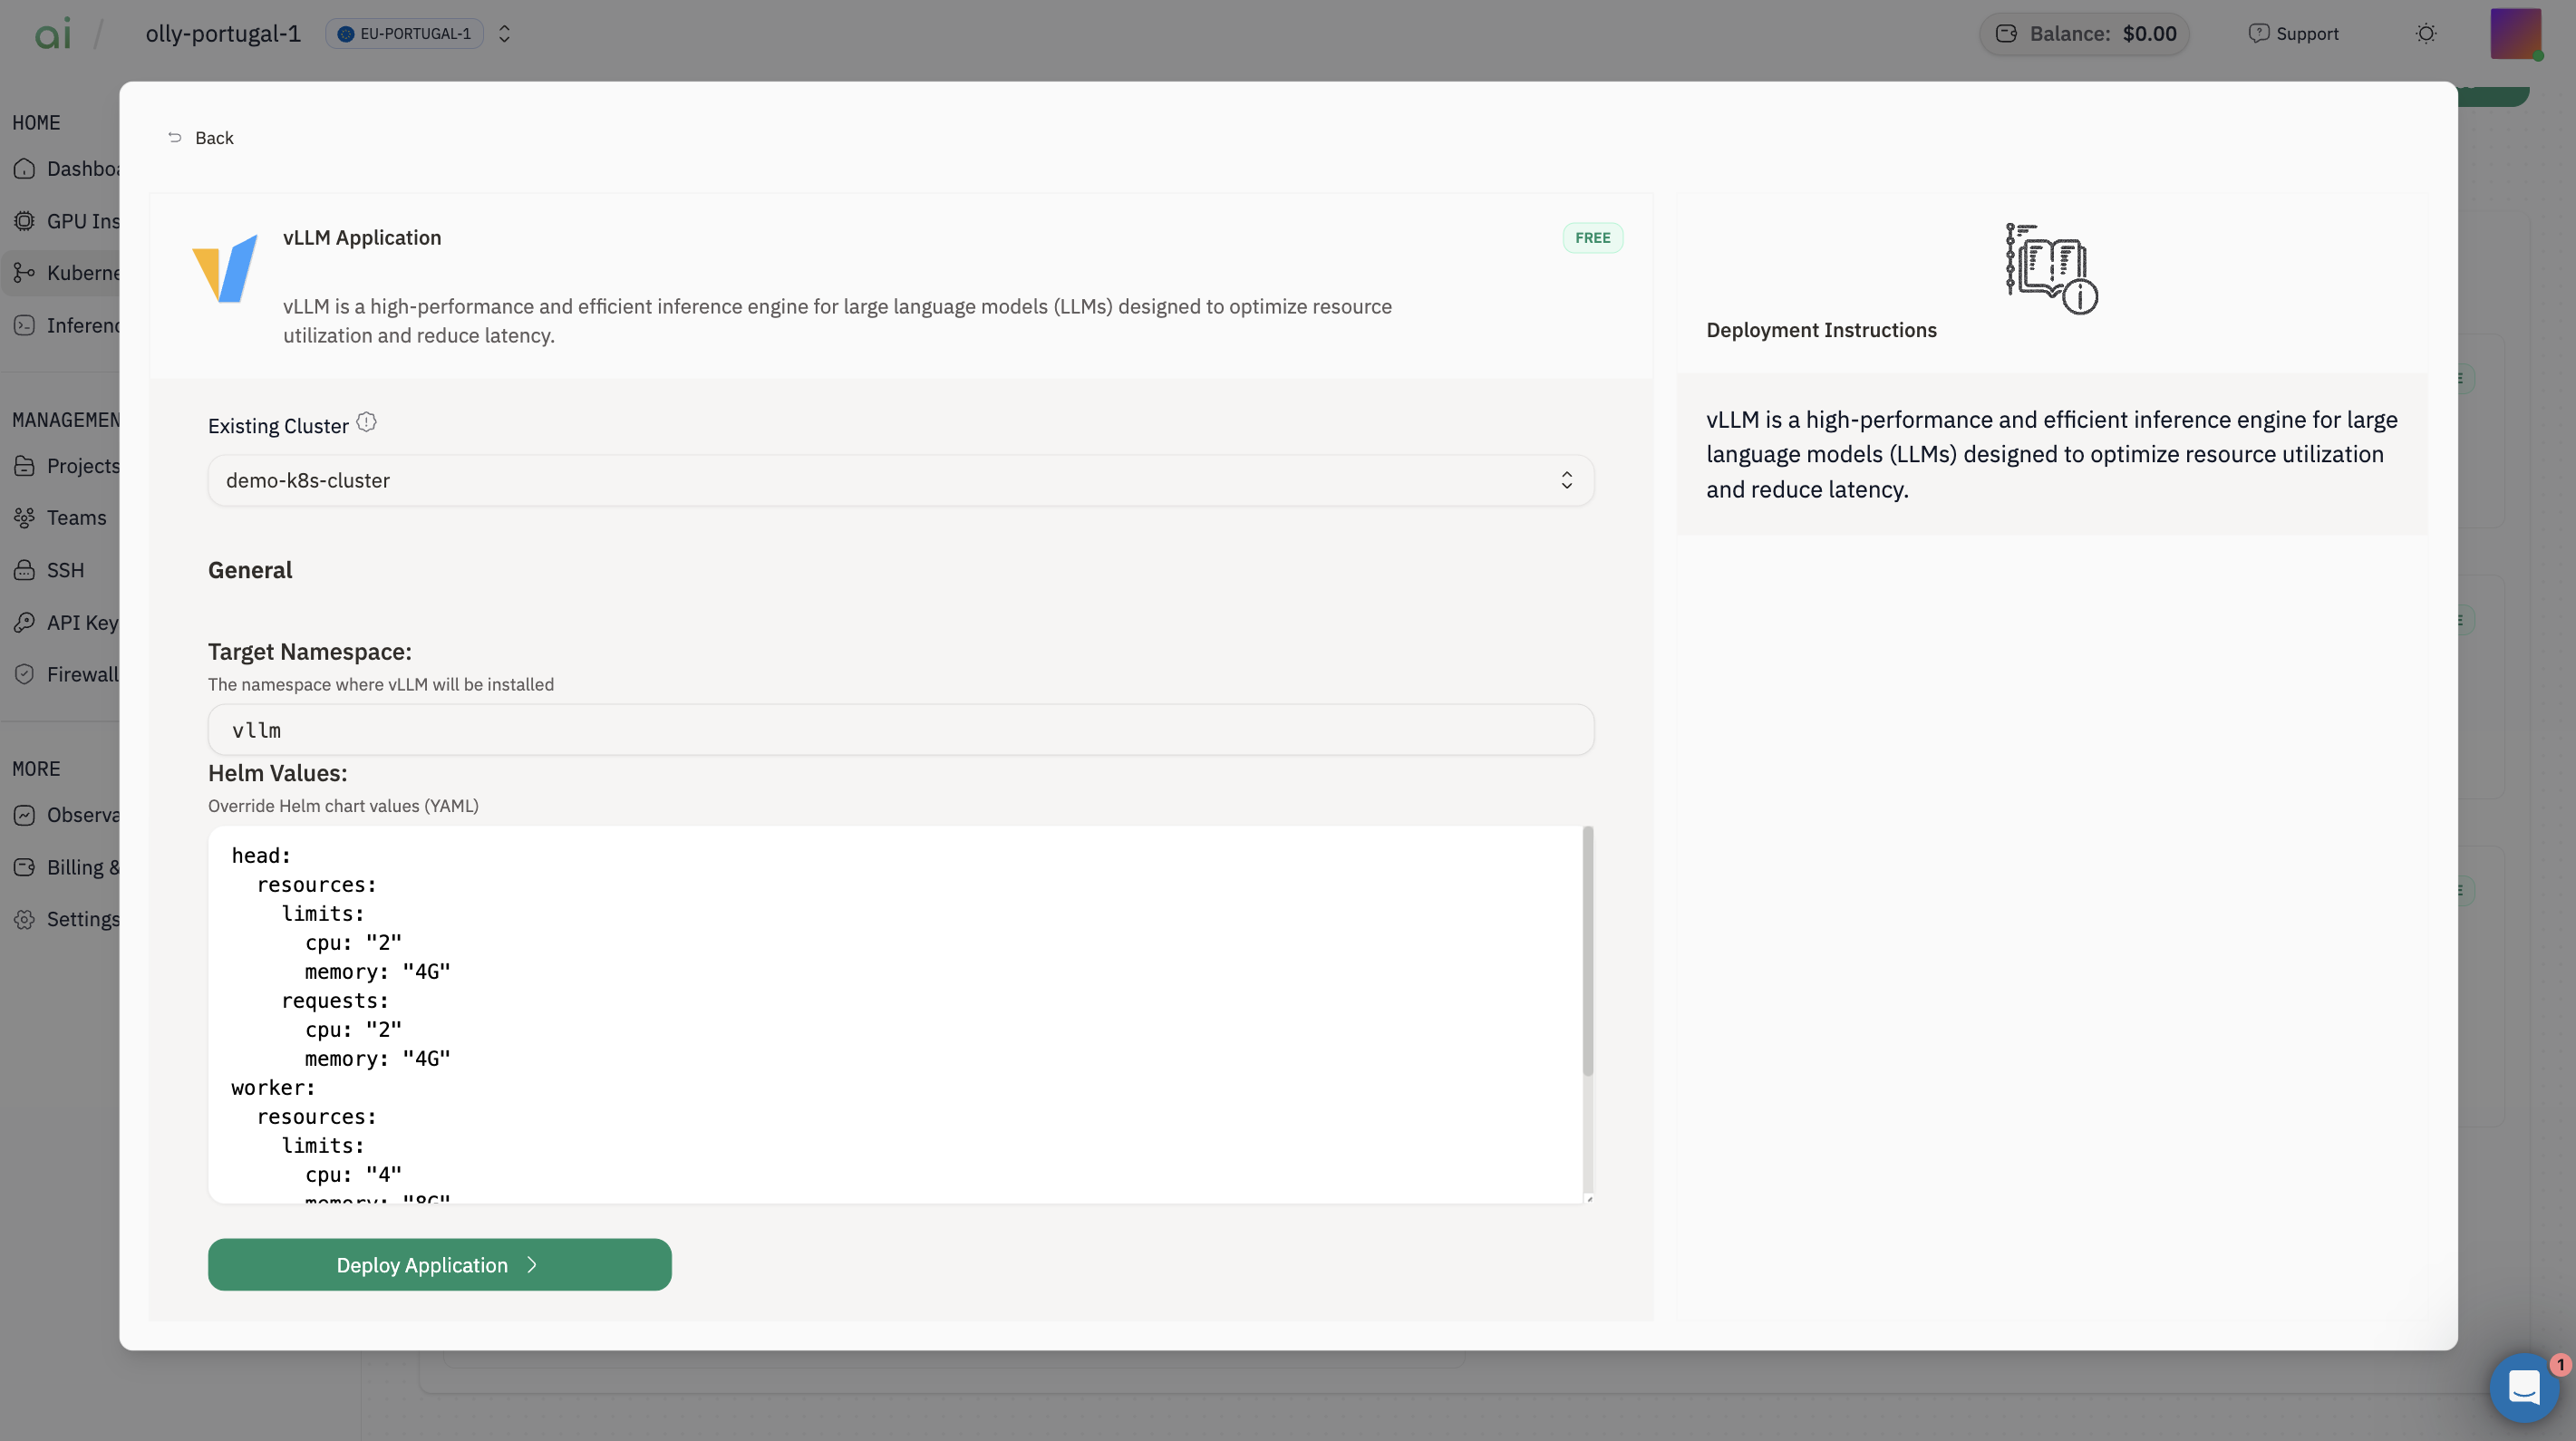
1. Find **vLLM Application** → click **View Details**
2. Select **Existing Cluster**
3. **Target Namespace** (example shown): `vllm`
4. Adjust **Helm Values** if needed (example defaults shown in your screenshot):
* `runtimeClassName: "nvidia"`
* a model like `facebook/opt-125m`
* `requestGPU: 1`
5. Click **Deploy Application**
**Verify (terminal):**
```bash theme={null}
kubectl get pods -n gpu-operator
kubectl get nodes -o wide
```
### Step 2: Install vLLM Application
1. Find **vLLM Application** → click **View Details**
2. Select **Existing Cluster**
3. **Target Namespace** (example shown): `vllm`
4. Adjust **Helm Values** if needed (example defaults shown in your screenshot):
* `runtimeClassName: "nvidia"`
* a model like `facebook/opt-125m`
* `requestGPU: 1`
5. Click **Deploy Application**
 **Verify (terminal):**
```bash theme={null}
kubectl get pods -n vllm
kubectl get svc -n vllm
```
Below is a drop-in continuation you can paste after the “Verify (terminal)” section. It completes the NODE\_PORT / ENDPOINT commands (with correct Bash syntax) and shows how to send an inference request to the vLLM **OpenAI-compatible** API.
## D) Get the vLLM endpoint
### Step 1: Identify the Service name
List Services in the `vllm` namespace and note the vLLM service name (often something like `vllm`, `vllm-service`, or `vllm-app`):
```bash theme={null}
kubectl get svc -n vllm
```
### Step 2: Fetch the NodePort and build the endpoint URL
Replace `` with the Service name you found above, and replace `` with your cluster ID (the same one in `k8s-.groundcontrol-aion.xyz`).
```bash theme={null}
# Namespace where you deployed vLLM
NAMESPACE=vllm
# Replace with the vLLM Service name shown by `kubectl get svc -n vllm`
SERVICE_NAME=
# Get the NodePort (assumes the Service is type NodePort and exposes exactly one port)
NODE_PORT=kubectl get svc -o jsonpath='{.spec.ports[*].nodePort}'
# Build the public endpoint (replace )
ENDPOINT="http://.groundcontrol-aion.xyz:{$NODE_PORT}"
echo "vLLM endpoint: ${ENDPOINT}"
```
### Step 3: Confirm the API is reachable
```bash theme={null}
curl -sS "${ENDPOINT}/v1/models" | head
```
### Step 4: Send an inference request (OpenAI-compatible)
#### Chat Completions (recommended)
Set the model name. If you’re not sure, run `/v1/models` first and copy the returned `id`.
```bash theme={null}
MODEL_ID="facebook/opt-125m" # change if your /v1/models shows a different id
curl -sS "${ENDPOINT}/v1/chat/completions" \
-H "Content-Type: application/json" \
-d "{
\"model\": \"${MODEL_ID}\",
\"messages\": [
{\"role\": \"system\", \"content\": \"You are a helpful assistant.\"},
{\"role\": \"user\", \"content\": \"Write a 1-sentence summary of what vLLM is.\"}
],
\"temperature\": 0.2,
\"max_tokens\": 80
}"
```
**Verify (terminal):**
```bash theme={null}
kubectl get pods -n vllm
kubectl get svc -n vllm
```
Below is a drop-in continuation you can paste after the “Verify (terminal)” section. It completes the NODE\_PORT / ENDPOINT commands (with correct Bash syntax) and shows how to send an inference request to the vLLM **OpenAI-compatible** API.
## D) Get the vLLM endpoint
### Step 1: Identify the Service name
List Services in the `vllm` namespace and note the vLLM service name (often something like `vllm`, `vllm-service`, or `vllm-app`):
```bash theme={null}
kubectl get svc -n vllm
```
### Step 2: Fetch the NodePort and build the endpoint URL
Replace `` with the Service name you found above, and replace `` with your cluster ID (the same one in `k8s-.groundcontrol-aion.xyz`).
```bash theme={null}
# Namespace where you deployed vLLM
NAMESPACE=vllm
# Replace with the vLLM Service name shown by `kubectl get svc -n vllm`
SERVICE_NAME=
# Get the NodePort (assumes the Service is type NodePort and exposes exactly one port)
NODE_PORT=kubectl get svc -o jsonpath='{.spec.ports[*].nodePort}'
# Build the public endpoint (replace )
ENDPOINT="http://.groundcontrol-aion.xyz:{$NODE_PORT}"
echo "vLLM endpoint: ${ENDPOINT}"
```
### Step 3: Confirm the API is reachable
```bash theme={null}
curl -sS "${ENDPOINT}/v1/models" | head
```
### Step 4: Send an inference request (OpenAI-compatible)
#### Chat Completions (recommended)
Set the model name. If you’re not sure, run `/v1/models` first and copy the returned `id`.
```bash theme={null}
MODEL_ID="facebook/opt-125m" # change if your /v1/models shows a different id
curl -sS "${ENDPOINT}/v1/chat/completions" \
-H "Content-Type: application/json" \
-d "{
\"model\": \"${MODEL_ID}\",
\"messages\": [
{\"role\": \"system\", \"content\": \"You are a helpful assistant.\"},
{\"role\": \"user\", \"content\": \"Write a 1-sentence summary of what vLLM is.\"}
],
\"temperature\": 0.2,
\"max_tokens\": 80
}"
```