> ## Documentation Index
> Fetch the complete documentation index at: https://docs.aion.xyz/llms.txt
> Use this file to discover all available pages before exploring further.
# Create a GPU Instance and Connect via SSH
> Get your GPU instance up and running in minutes. This guide walks you through creating your first AION GPU instance and connecting to it via SSH.
#### Step 1: Create Your Account
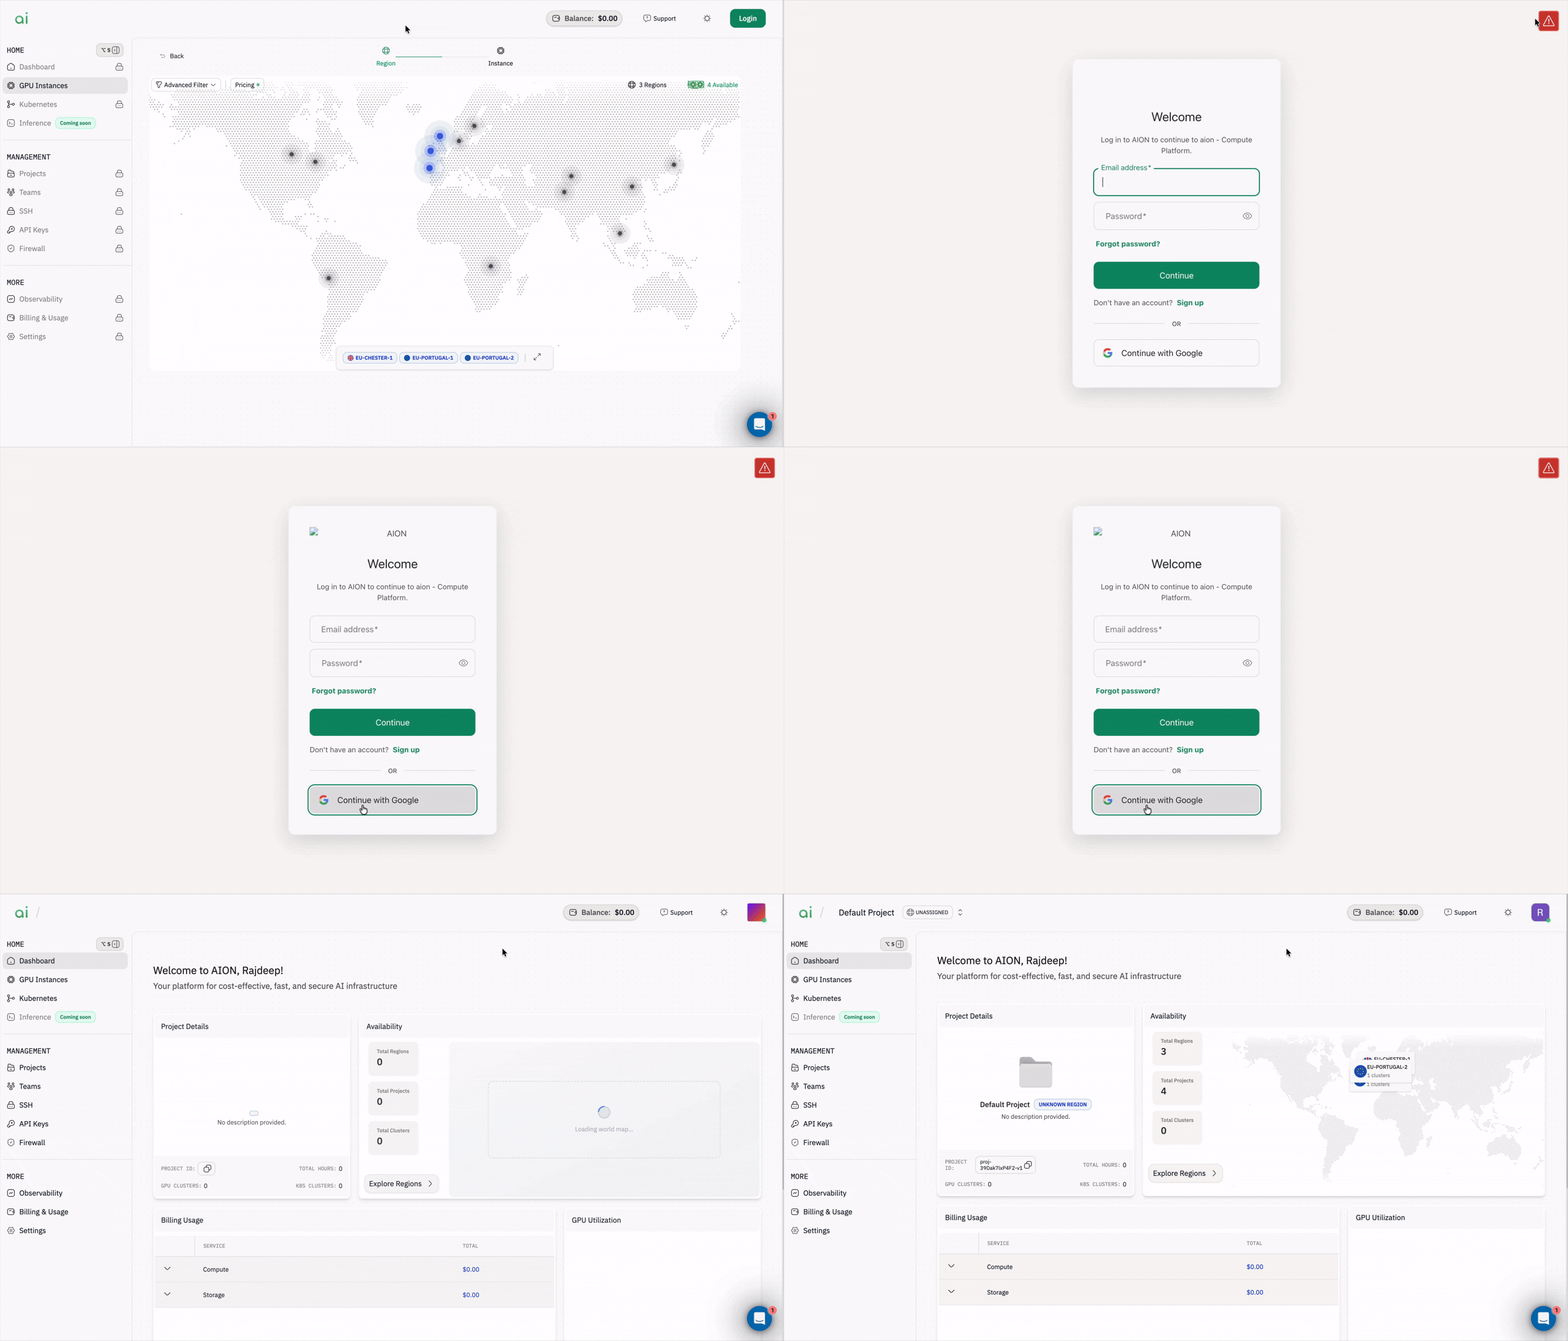
Start by navigating to AION's login screen.
1. Click `Sign up` to create a new account
2. Alternatively, use `Continue with Google` for faster authentication
Once logged in, you'll see the AION console with a navigation sidebar on the left.
 #### Step 2: Upload Your SSH Key
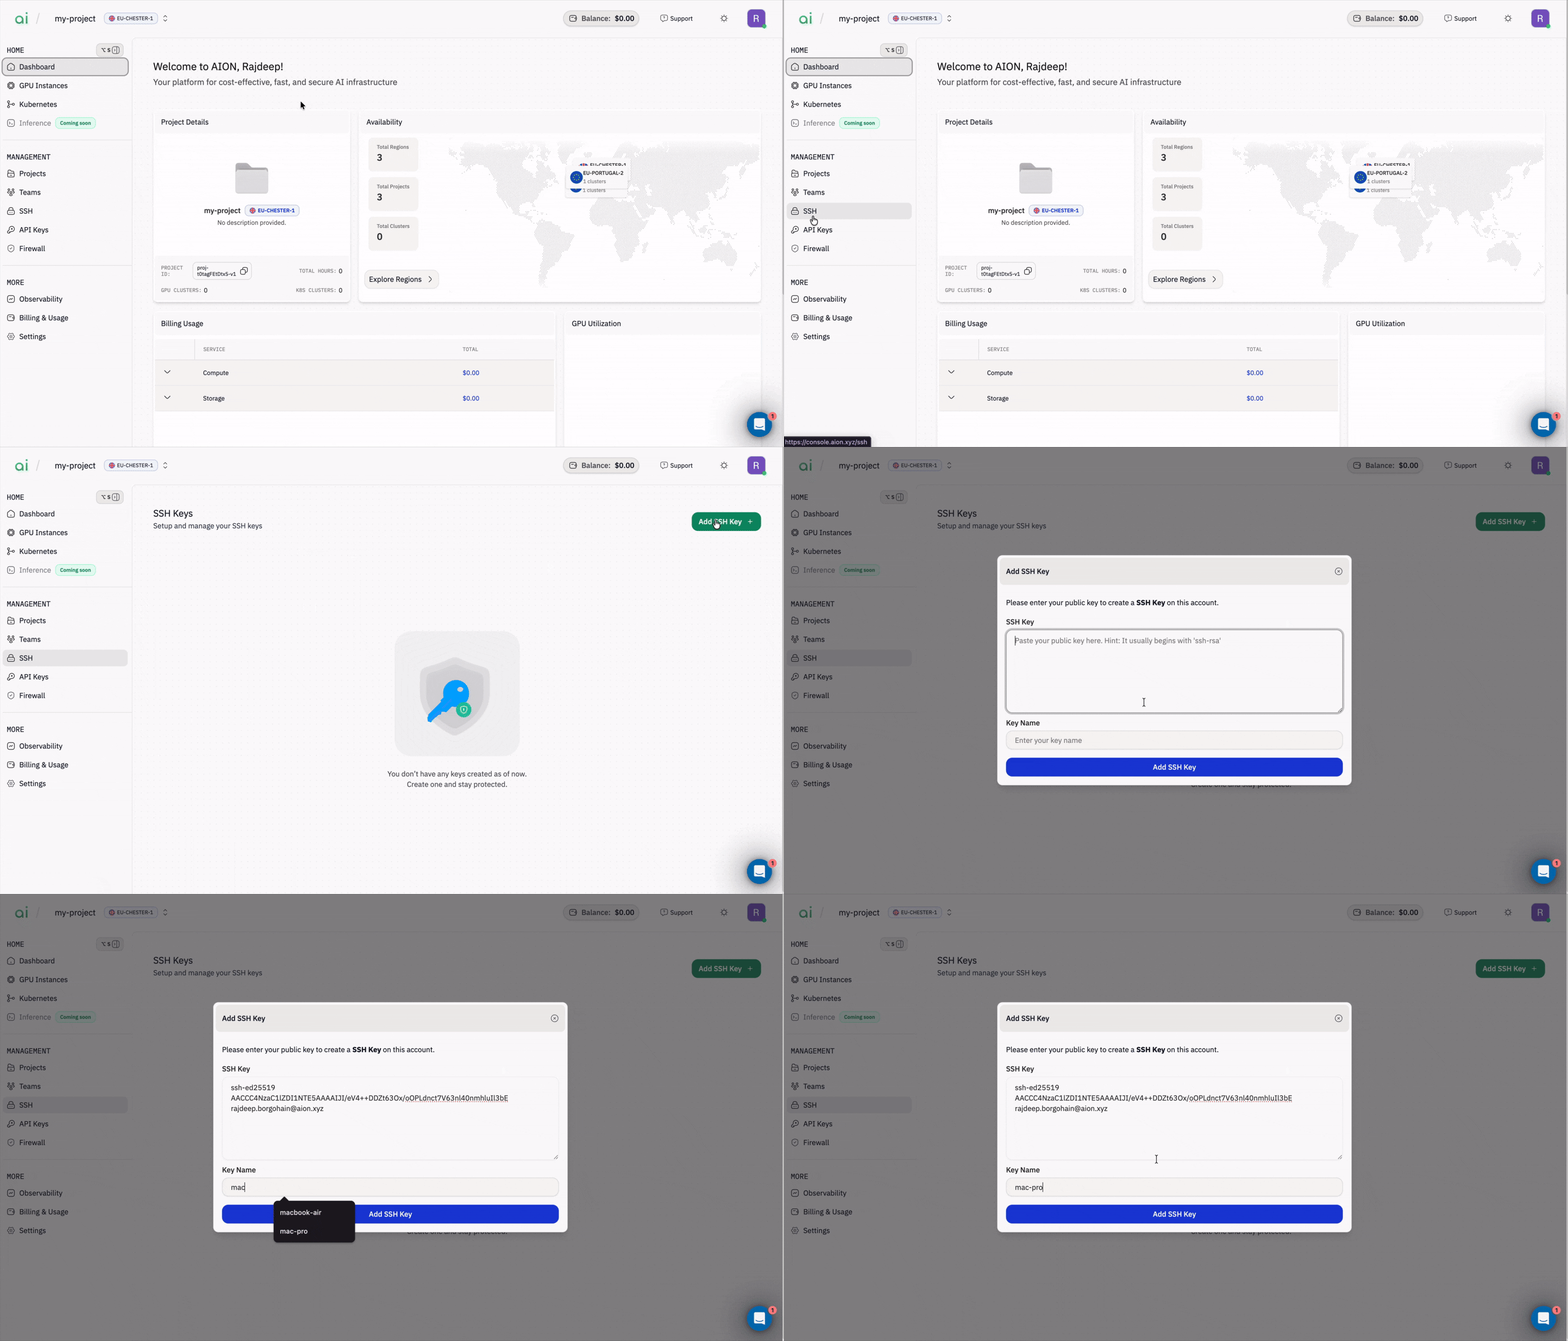
SSH keys enable secure access to your GPU instances. You'll need to upload your public key before creating an instance.
`To upload your SSH key:`
1. In the left sidebar, navigate to `Management → SSH`
2. Click to upload your `public SSH key`
3. Give your key a memorable name or label for easy identification
Your uploaded key will now appear in the `SSH Key` dropdown when creating instances.
> `Important:` If you skip this step, you won't see any SSH key options later. Simply return to `Management → SSH`, upload your key, then continue with instance creation.
#### Step 2: Upload Your SSH Key
SSH keys enable secure access to your GPU instances. You'll need to upload your public key before creating an instance.
`To upload your SSH key:`
1. In the left sidebar, navigate to `Management → SSH`
2. Click to upload your `public SSH key`
3. Give your key a memorable name or label for easy identification
Your uploaded key will now appear in the `SSH Key` dropdown when creating instances.
> `Important:` If you skip this step, you won't see any SSH key options later. Simply return to `Management → SSH`, upload your key, then continue with instance creation.
 #### Step 3: Create Your GPU Instance
1. In the left sidebar, click `Home`, then select `GPU Instances`. You'll see an empty state with a green `Create Instance +` button in the center.
#### Step 3: Create Your GPU Instance
1. In the left sidebar, click `Home`, then select `GPU Instances`. You'll see an empty state with a green `Create Instance +` button in the center.
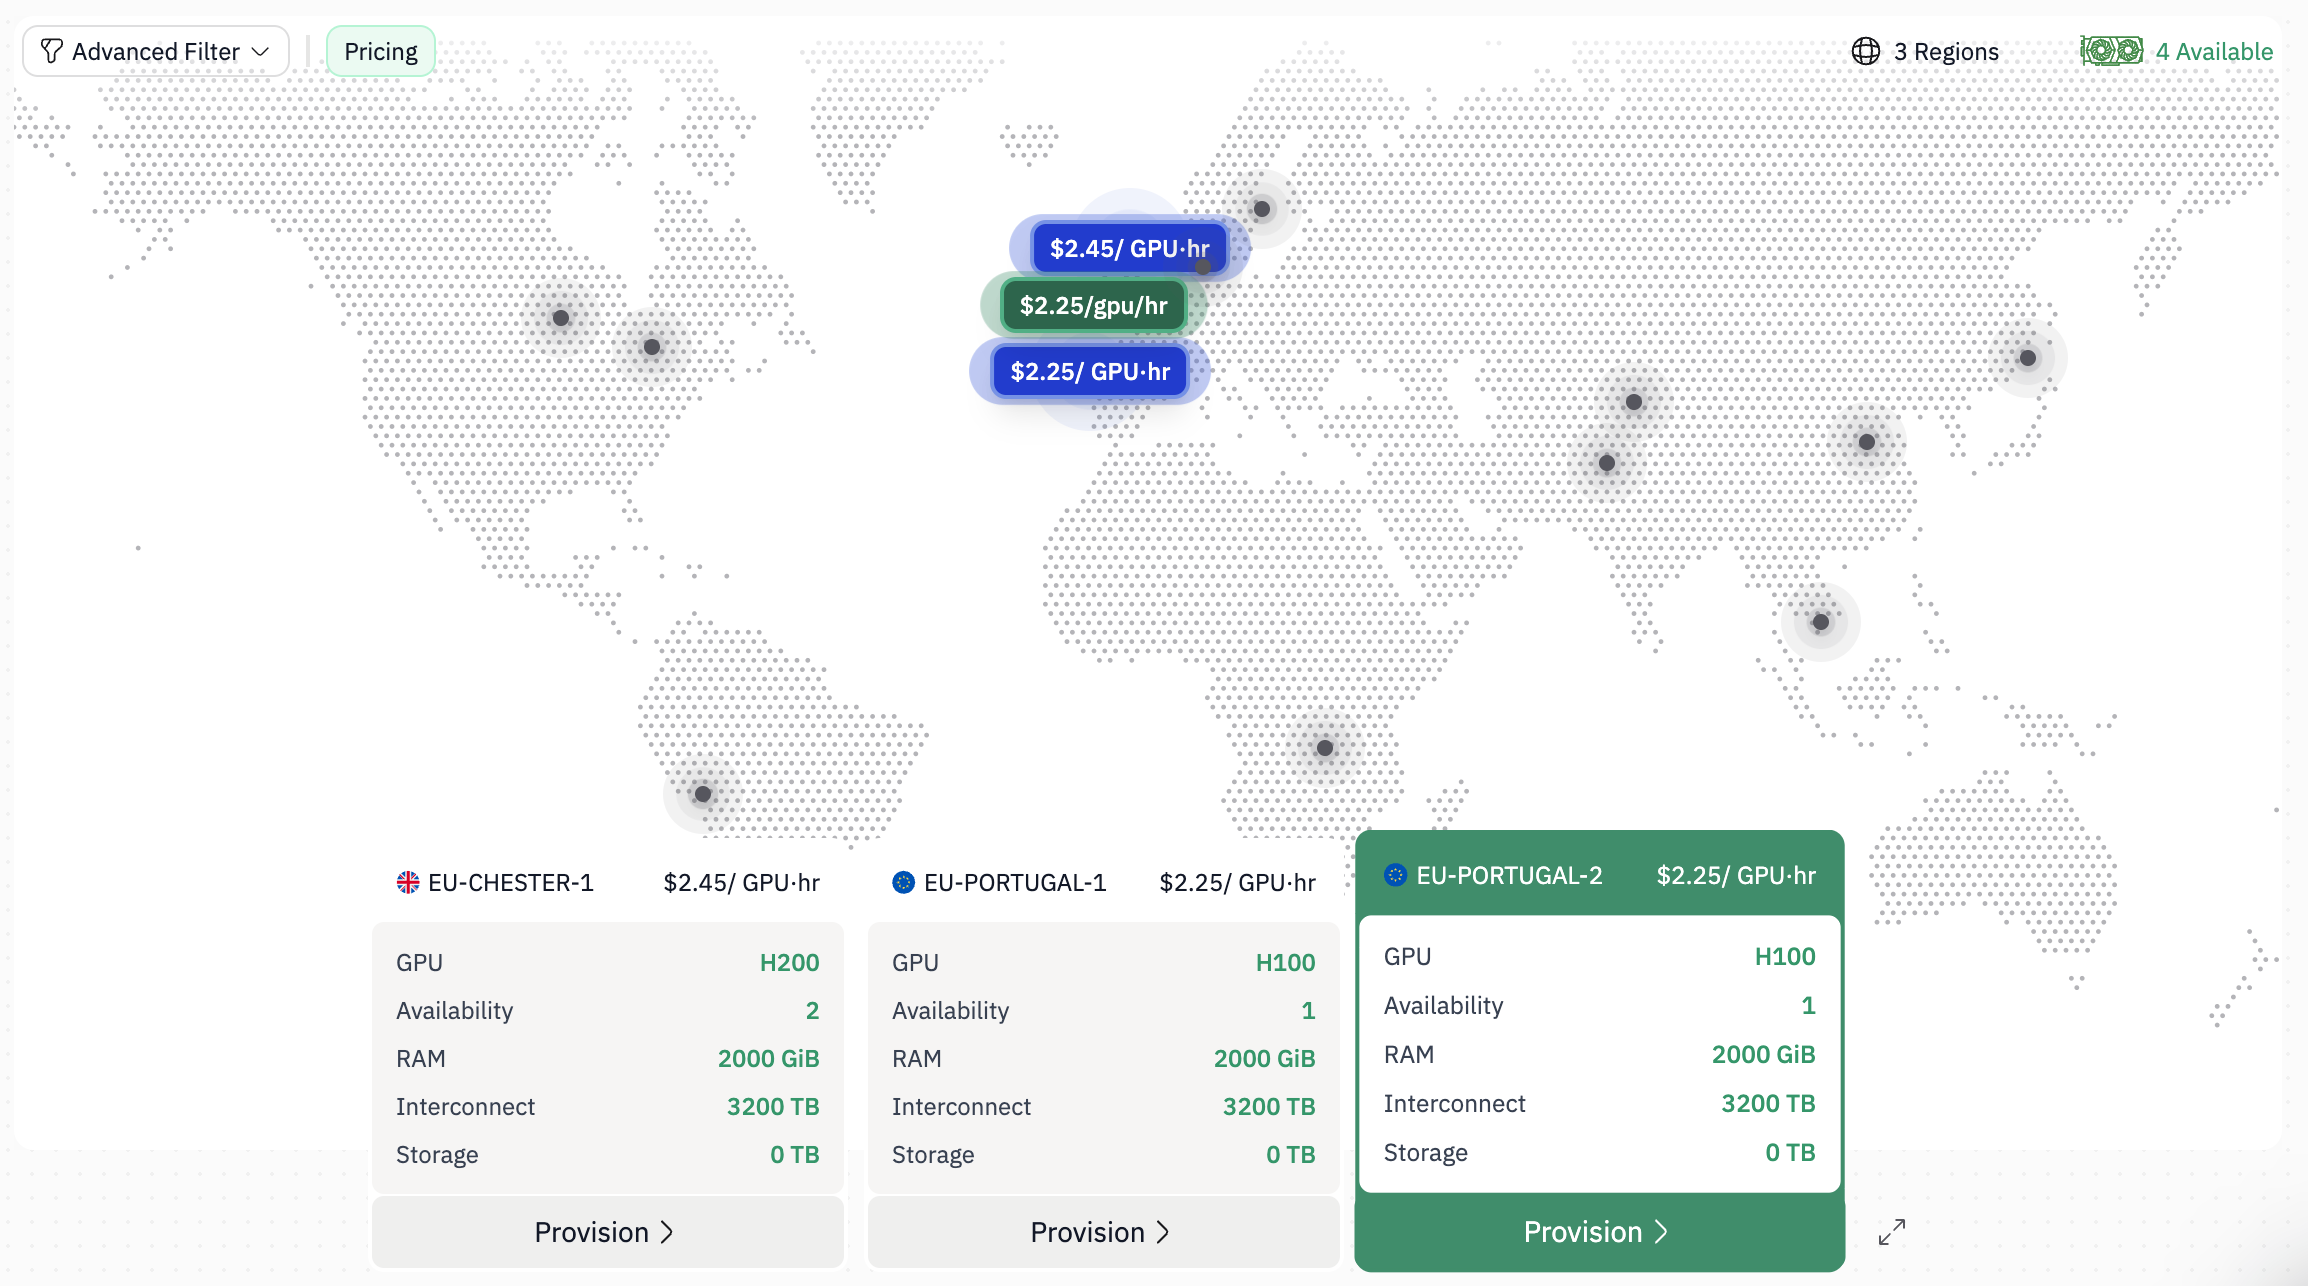
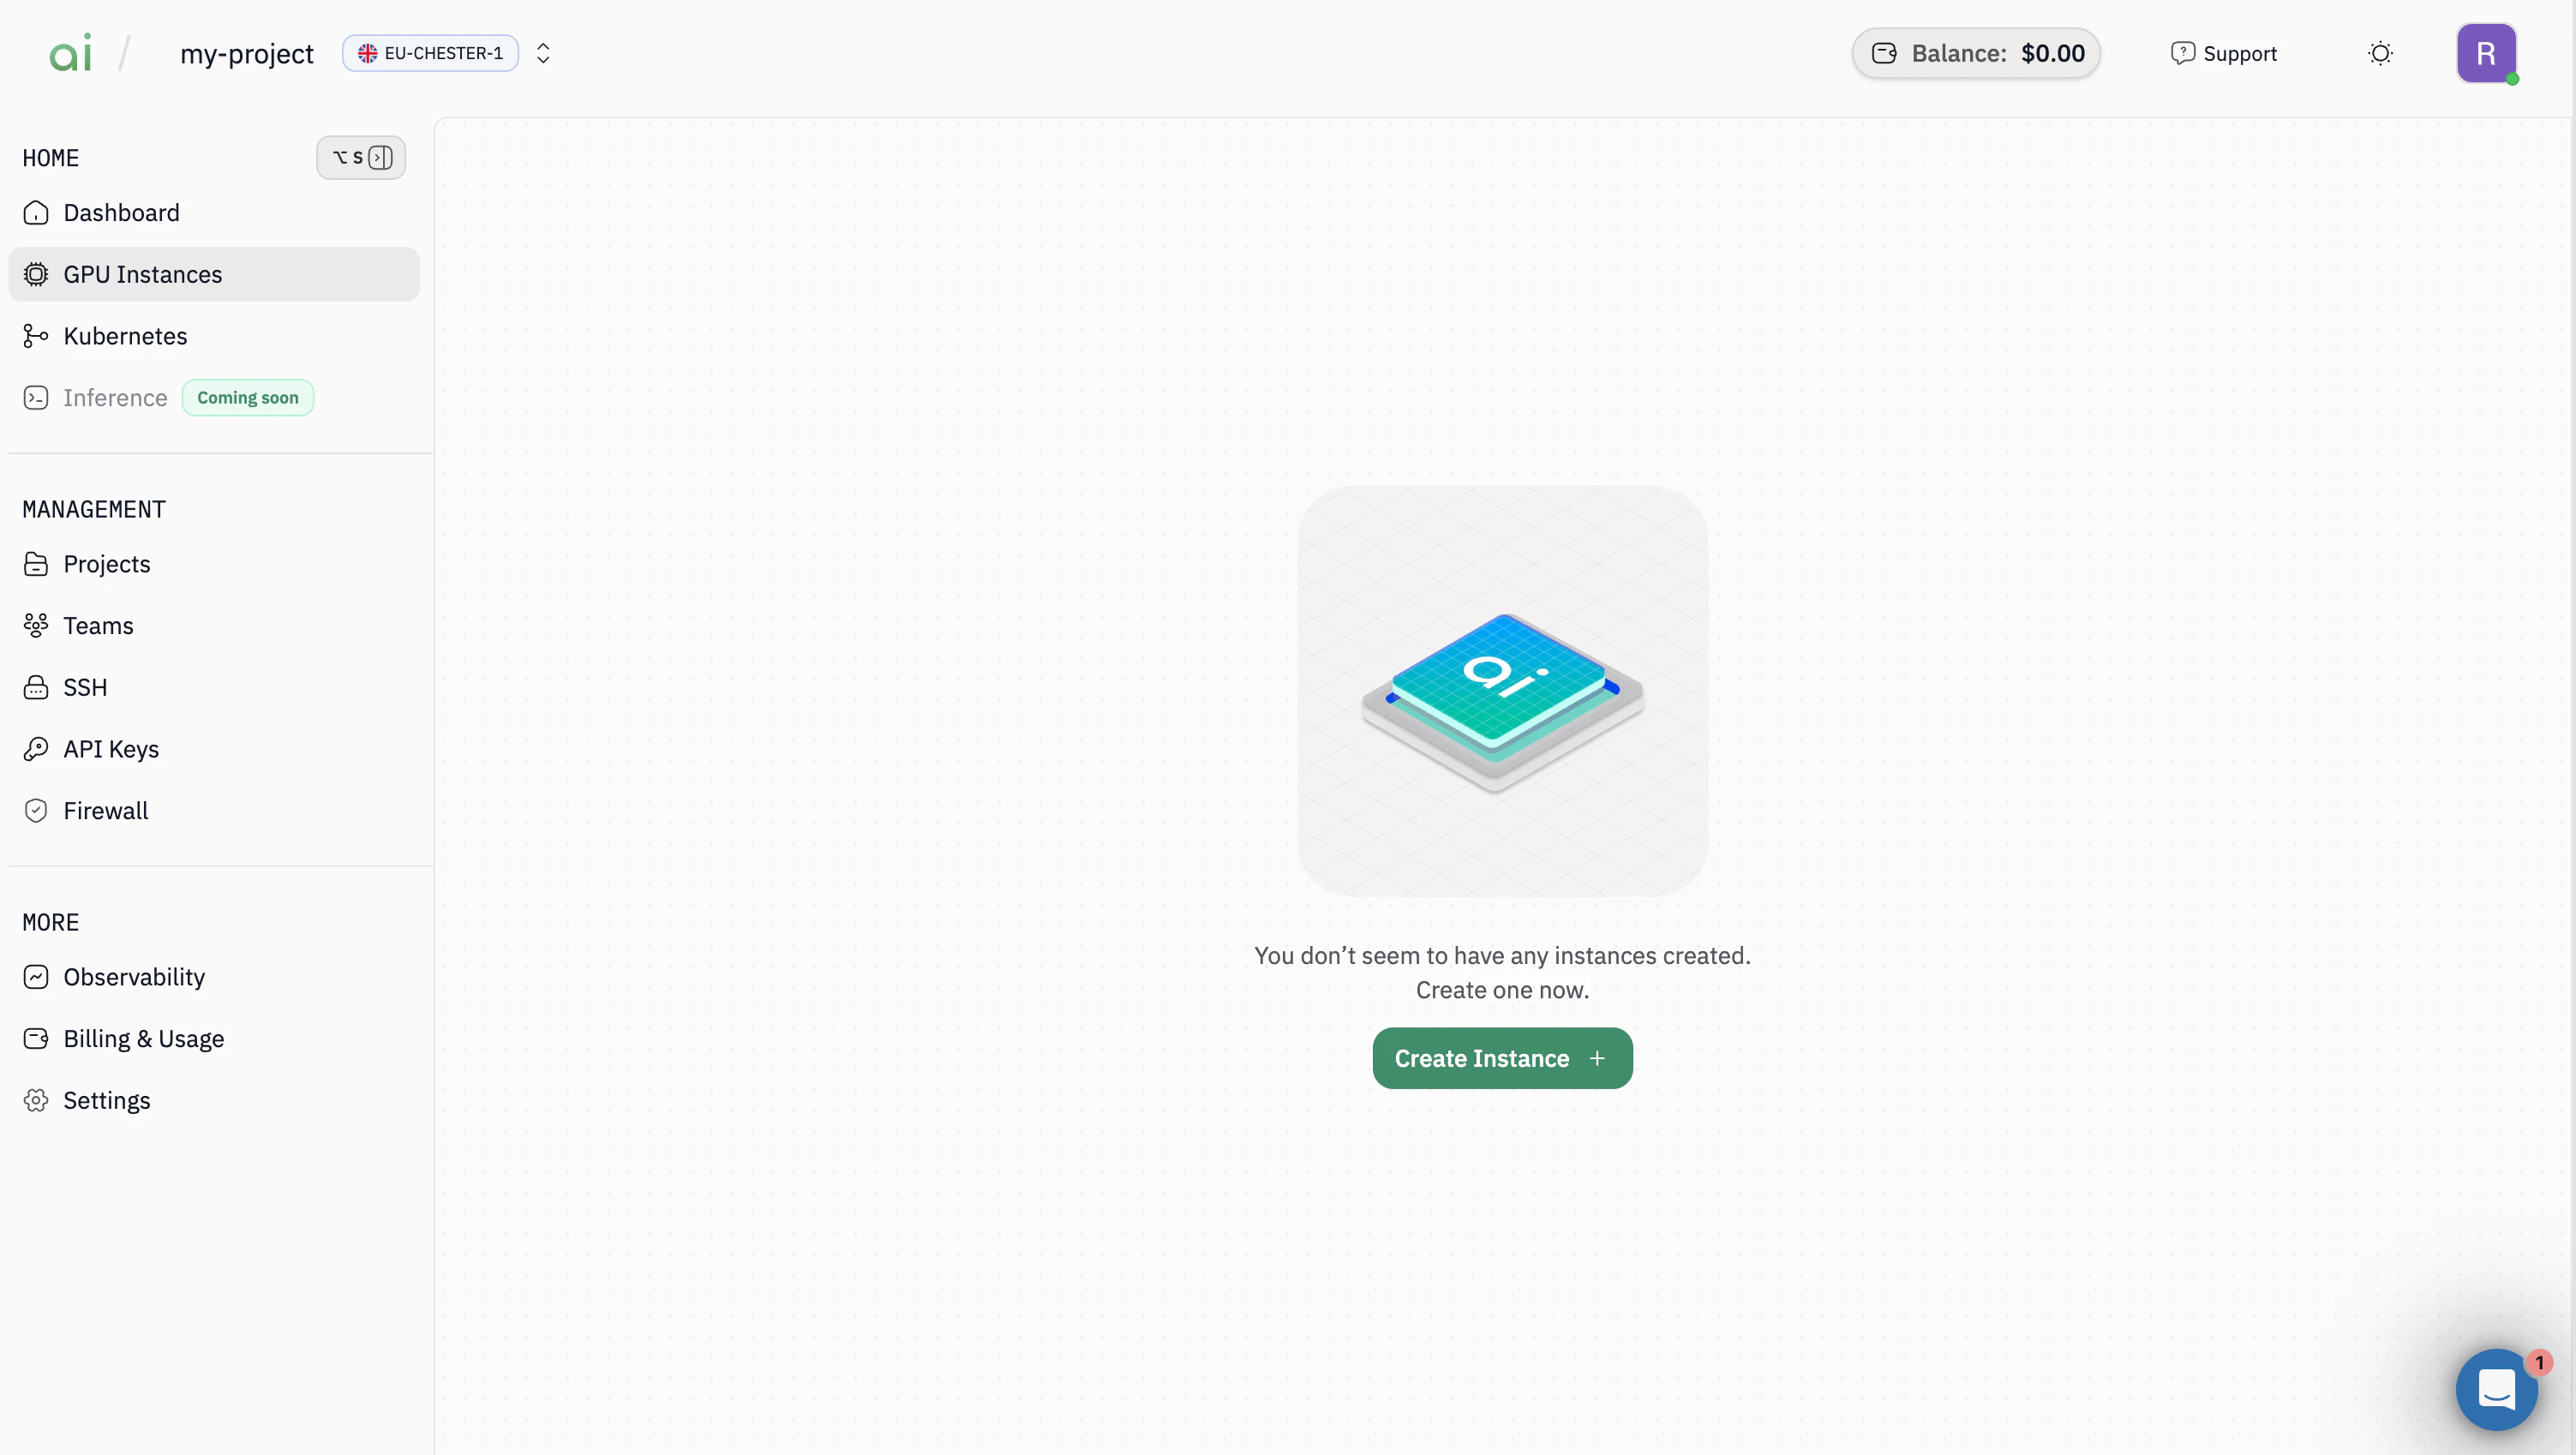 2. Click on the `Create Instance +` to start provisioning a new instance. You’ll see an interactive world map with all available regions and their pricing.
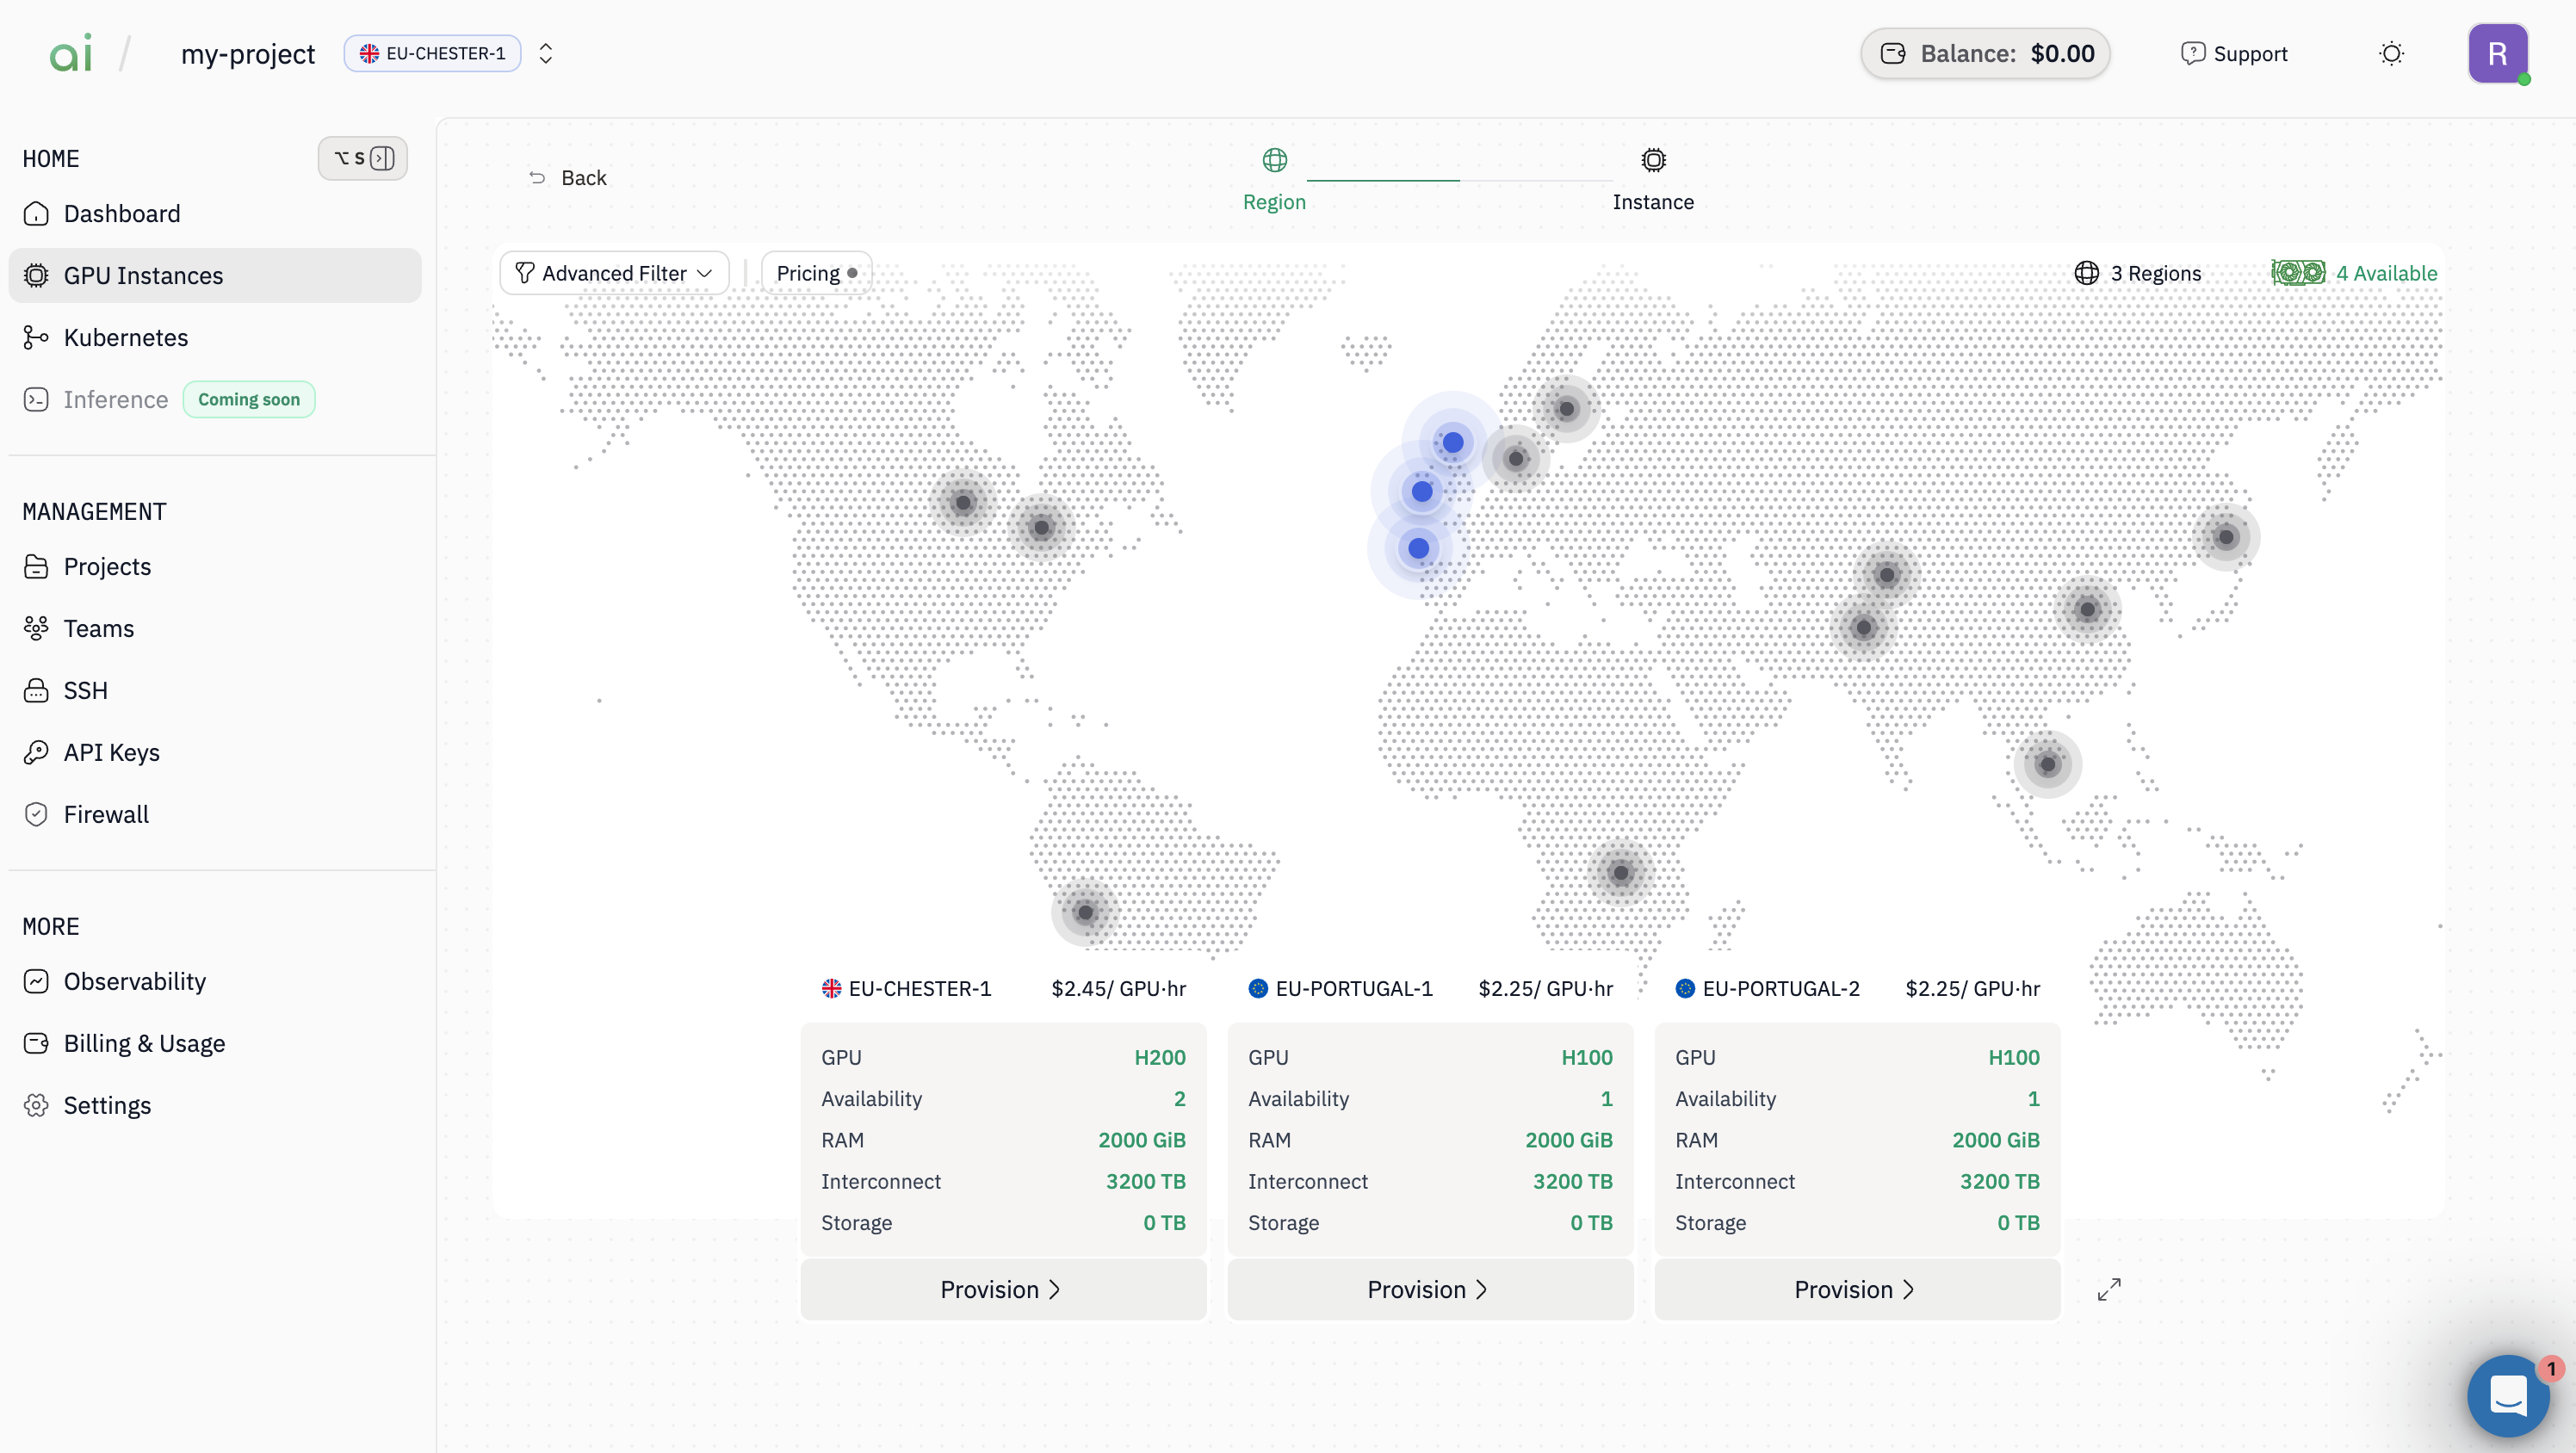 3. Review the available regions and their pricing and then Click `Provision` on your chosen region's card.
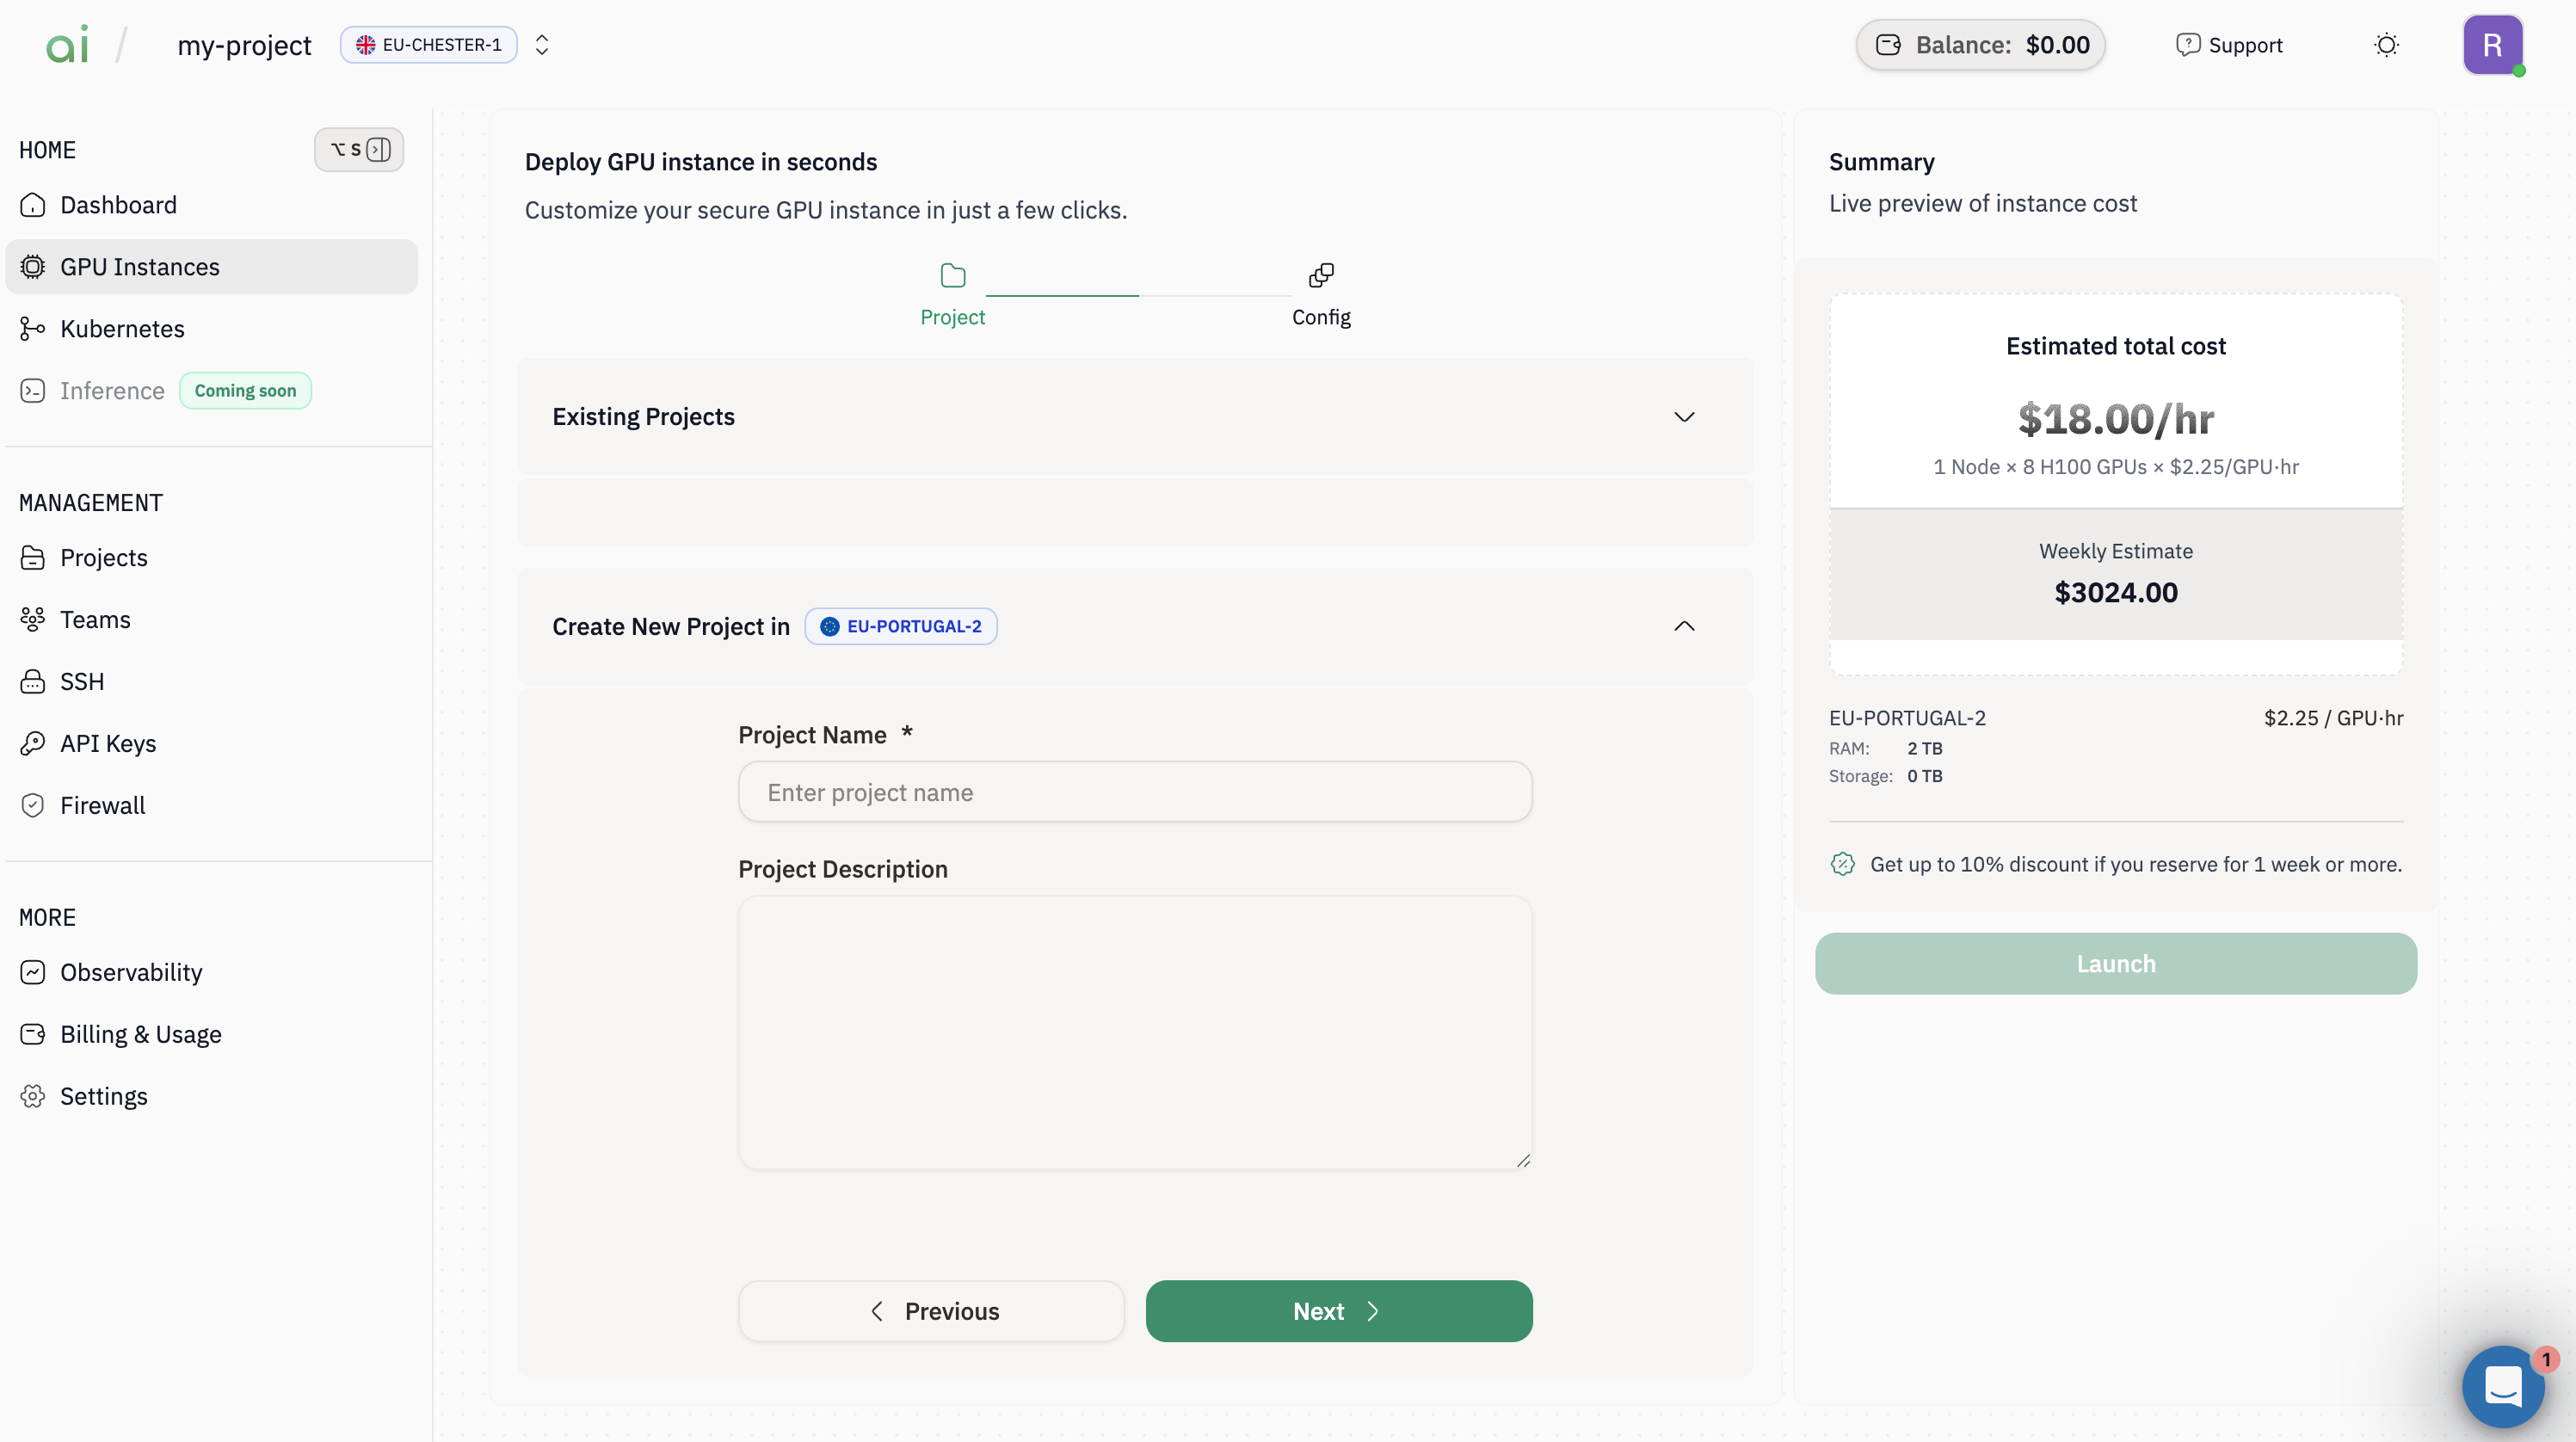
 4. After selecting a region, you'll need to select or create a new project. You can use an existing project or create a new project.
In the `Create New Project` section, enter:
* `Project Name` (required)
* `Project Description` (optional but helpful for organizing workloads)
Click `Next` to proceed to configuration.
4. After selecting a region, you'll need to select or create a new project. You can use an existing project or create a new project.
In the `Create New Project` section, enter:
* `Project Name` (required)
* `Project Description` (optional but helpful for organizing workloads)
Click `Next` to proceed to configuration.
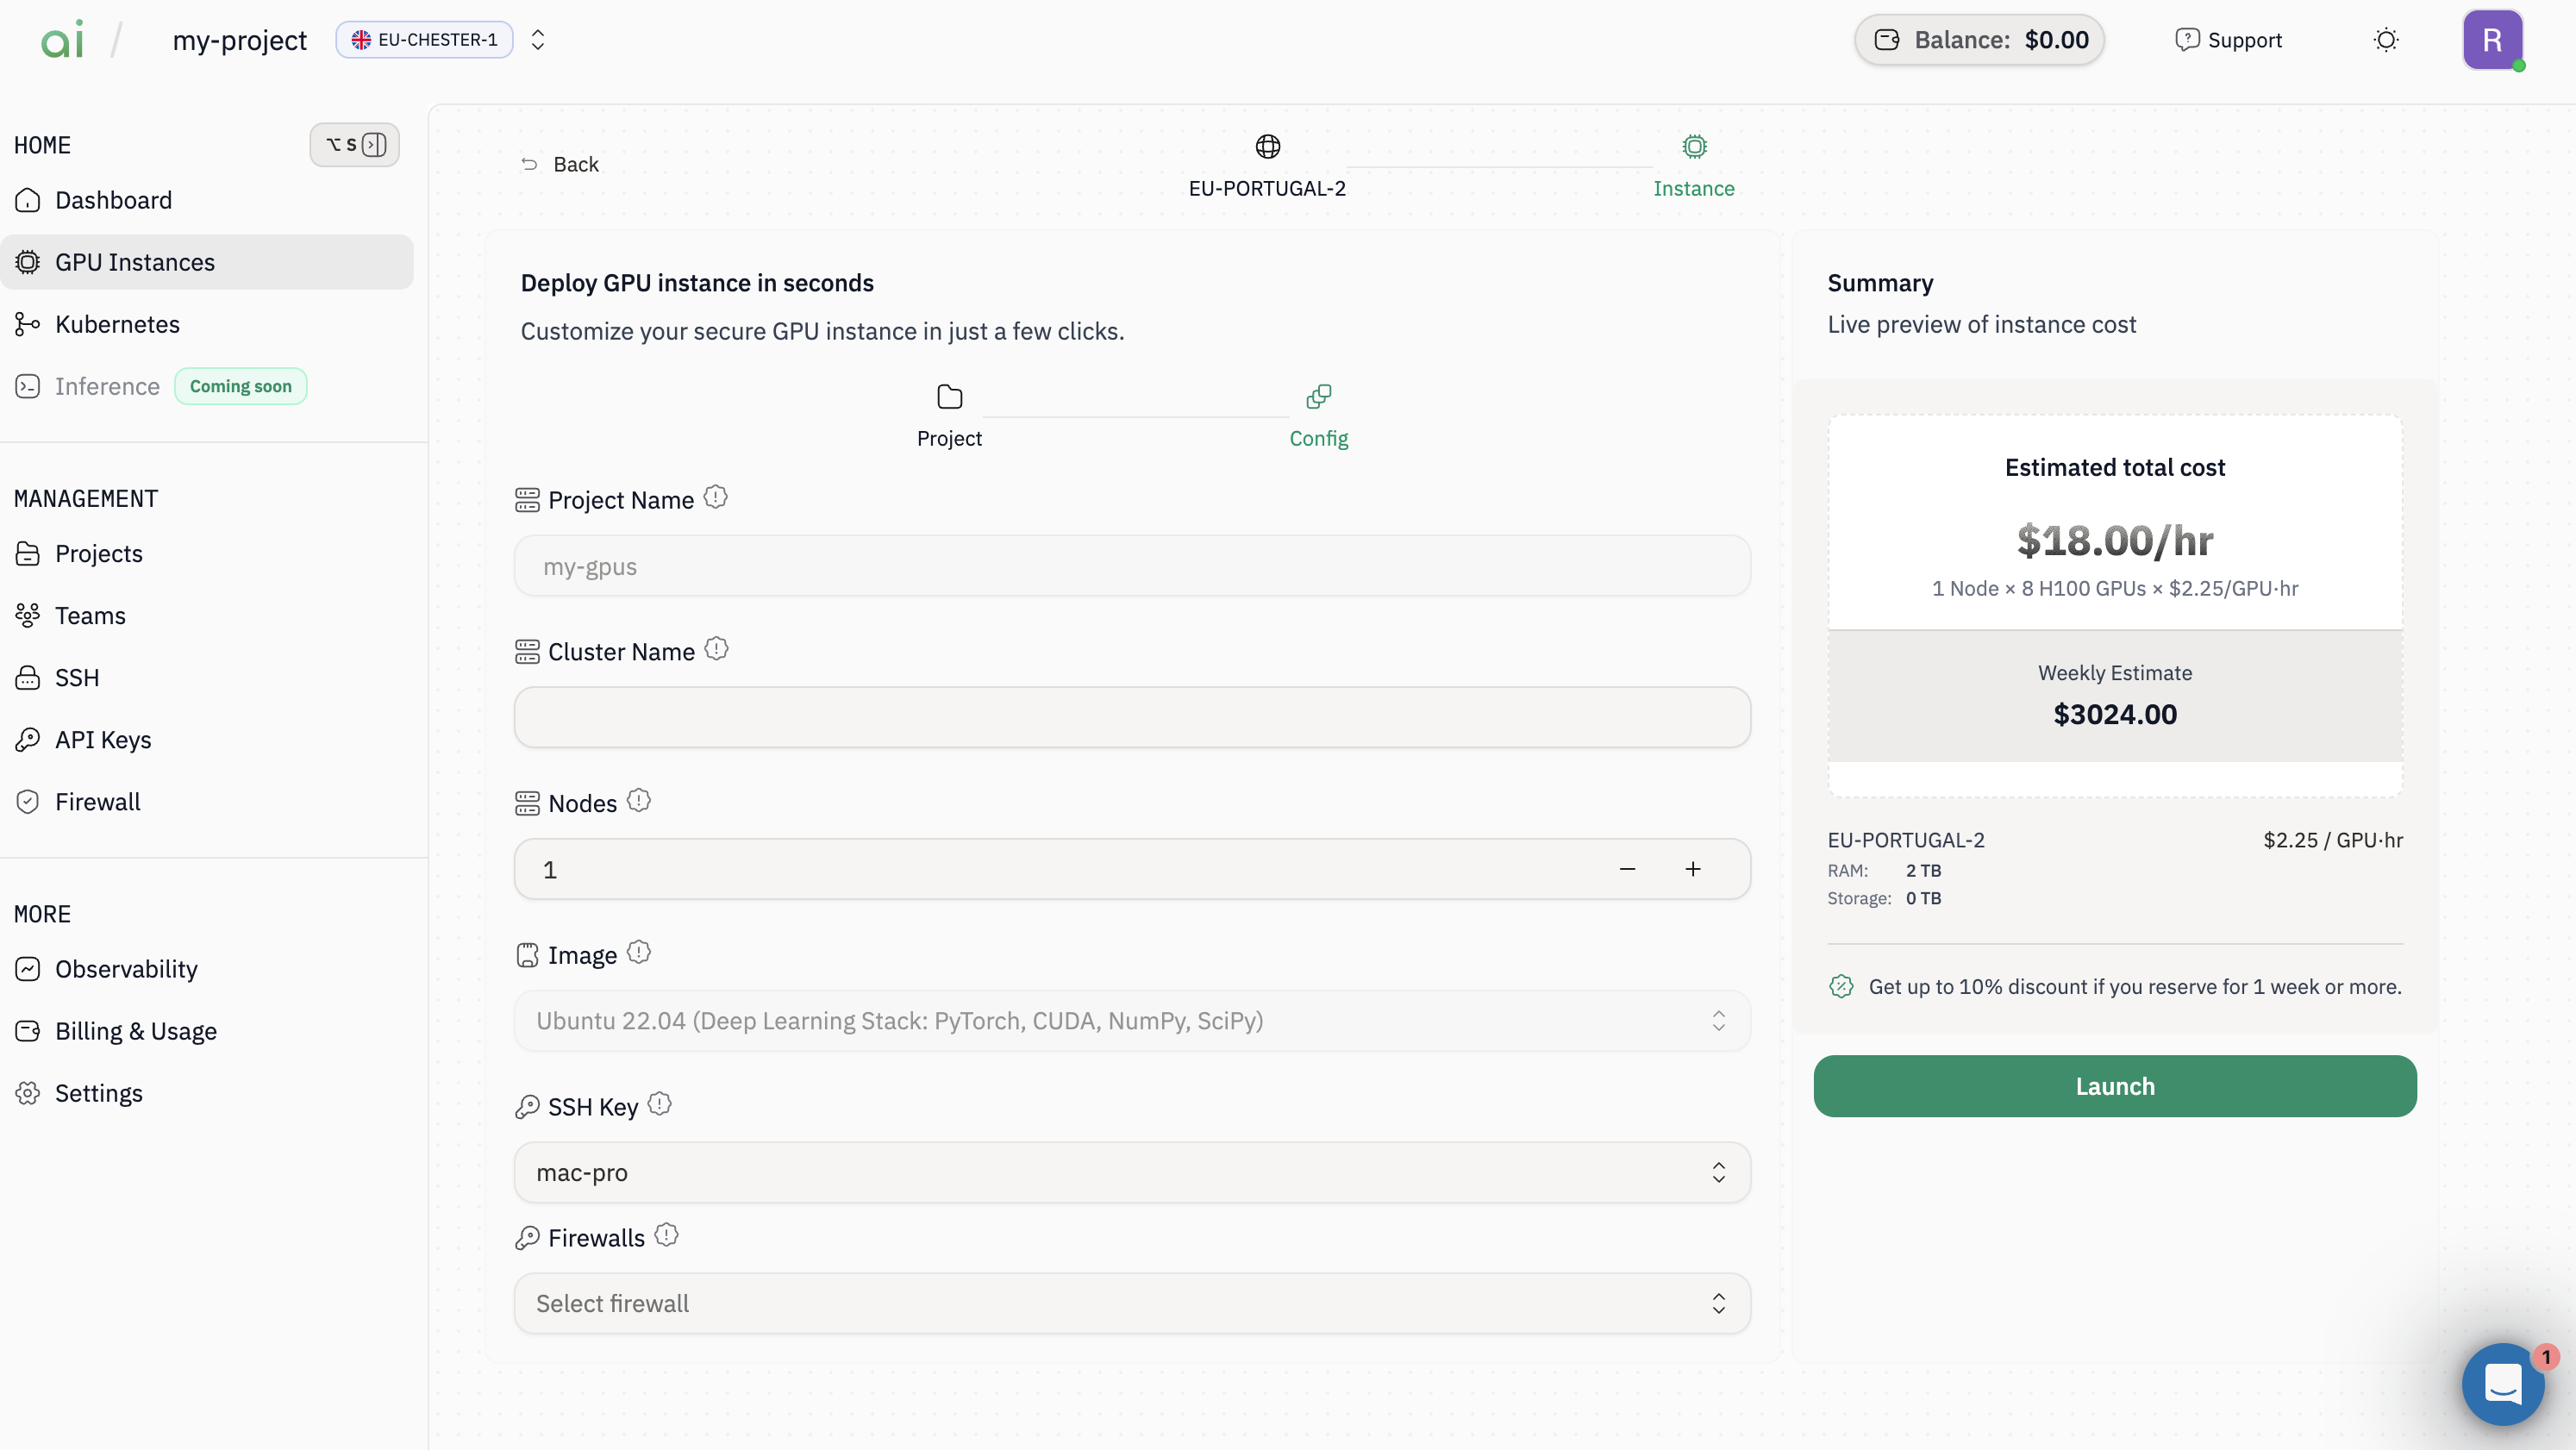
 5. Now you'll define and configure the specifics of your GPU instance. Key configuration fields:
| | |
| -------------- | ------------------------------------------------------------------------- |
| `Cluster Name` | Choose a name you’ll recognize in your instances list. |
| `Nodes` | Use the **– / +** controls to set the number of machines in your cluster. |
| `Image` | Select a pre-configured operating system to launch your instance. |
| `SSH Key` | Select the SSH key you uploaded in Step 2. |
5. Now you'll define and configure the specifics of your GPU instance. Key configuration fields:
| | |
| -------------- | ------------------------------------------------------------------------- |
| `Cluster Name` | Choose a name you’ll recognize in your instances list. |
| `Nodes` | Use the **– / +** controls to set the number of machines in your cluster. |
| `Image` | Select a pre-configured operating system to launch your instance. |
| `SSH Key` | Select the SSH key you uploaded in Step 2. |
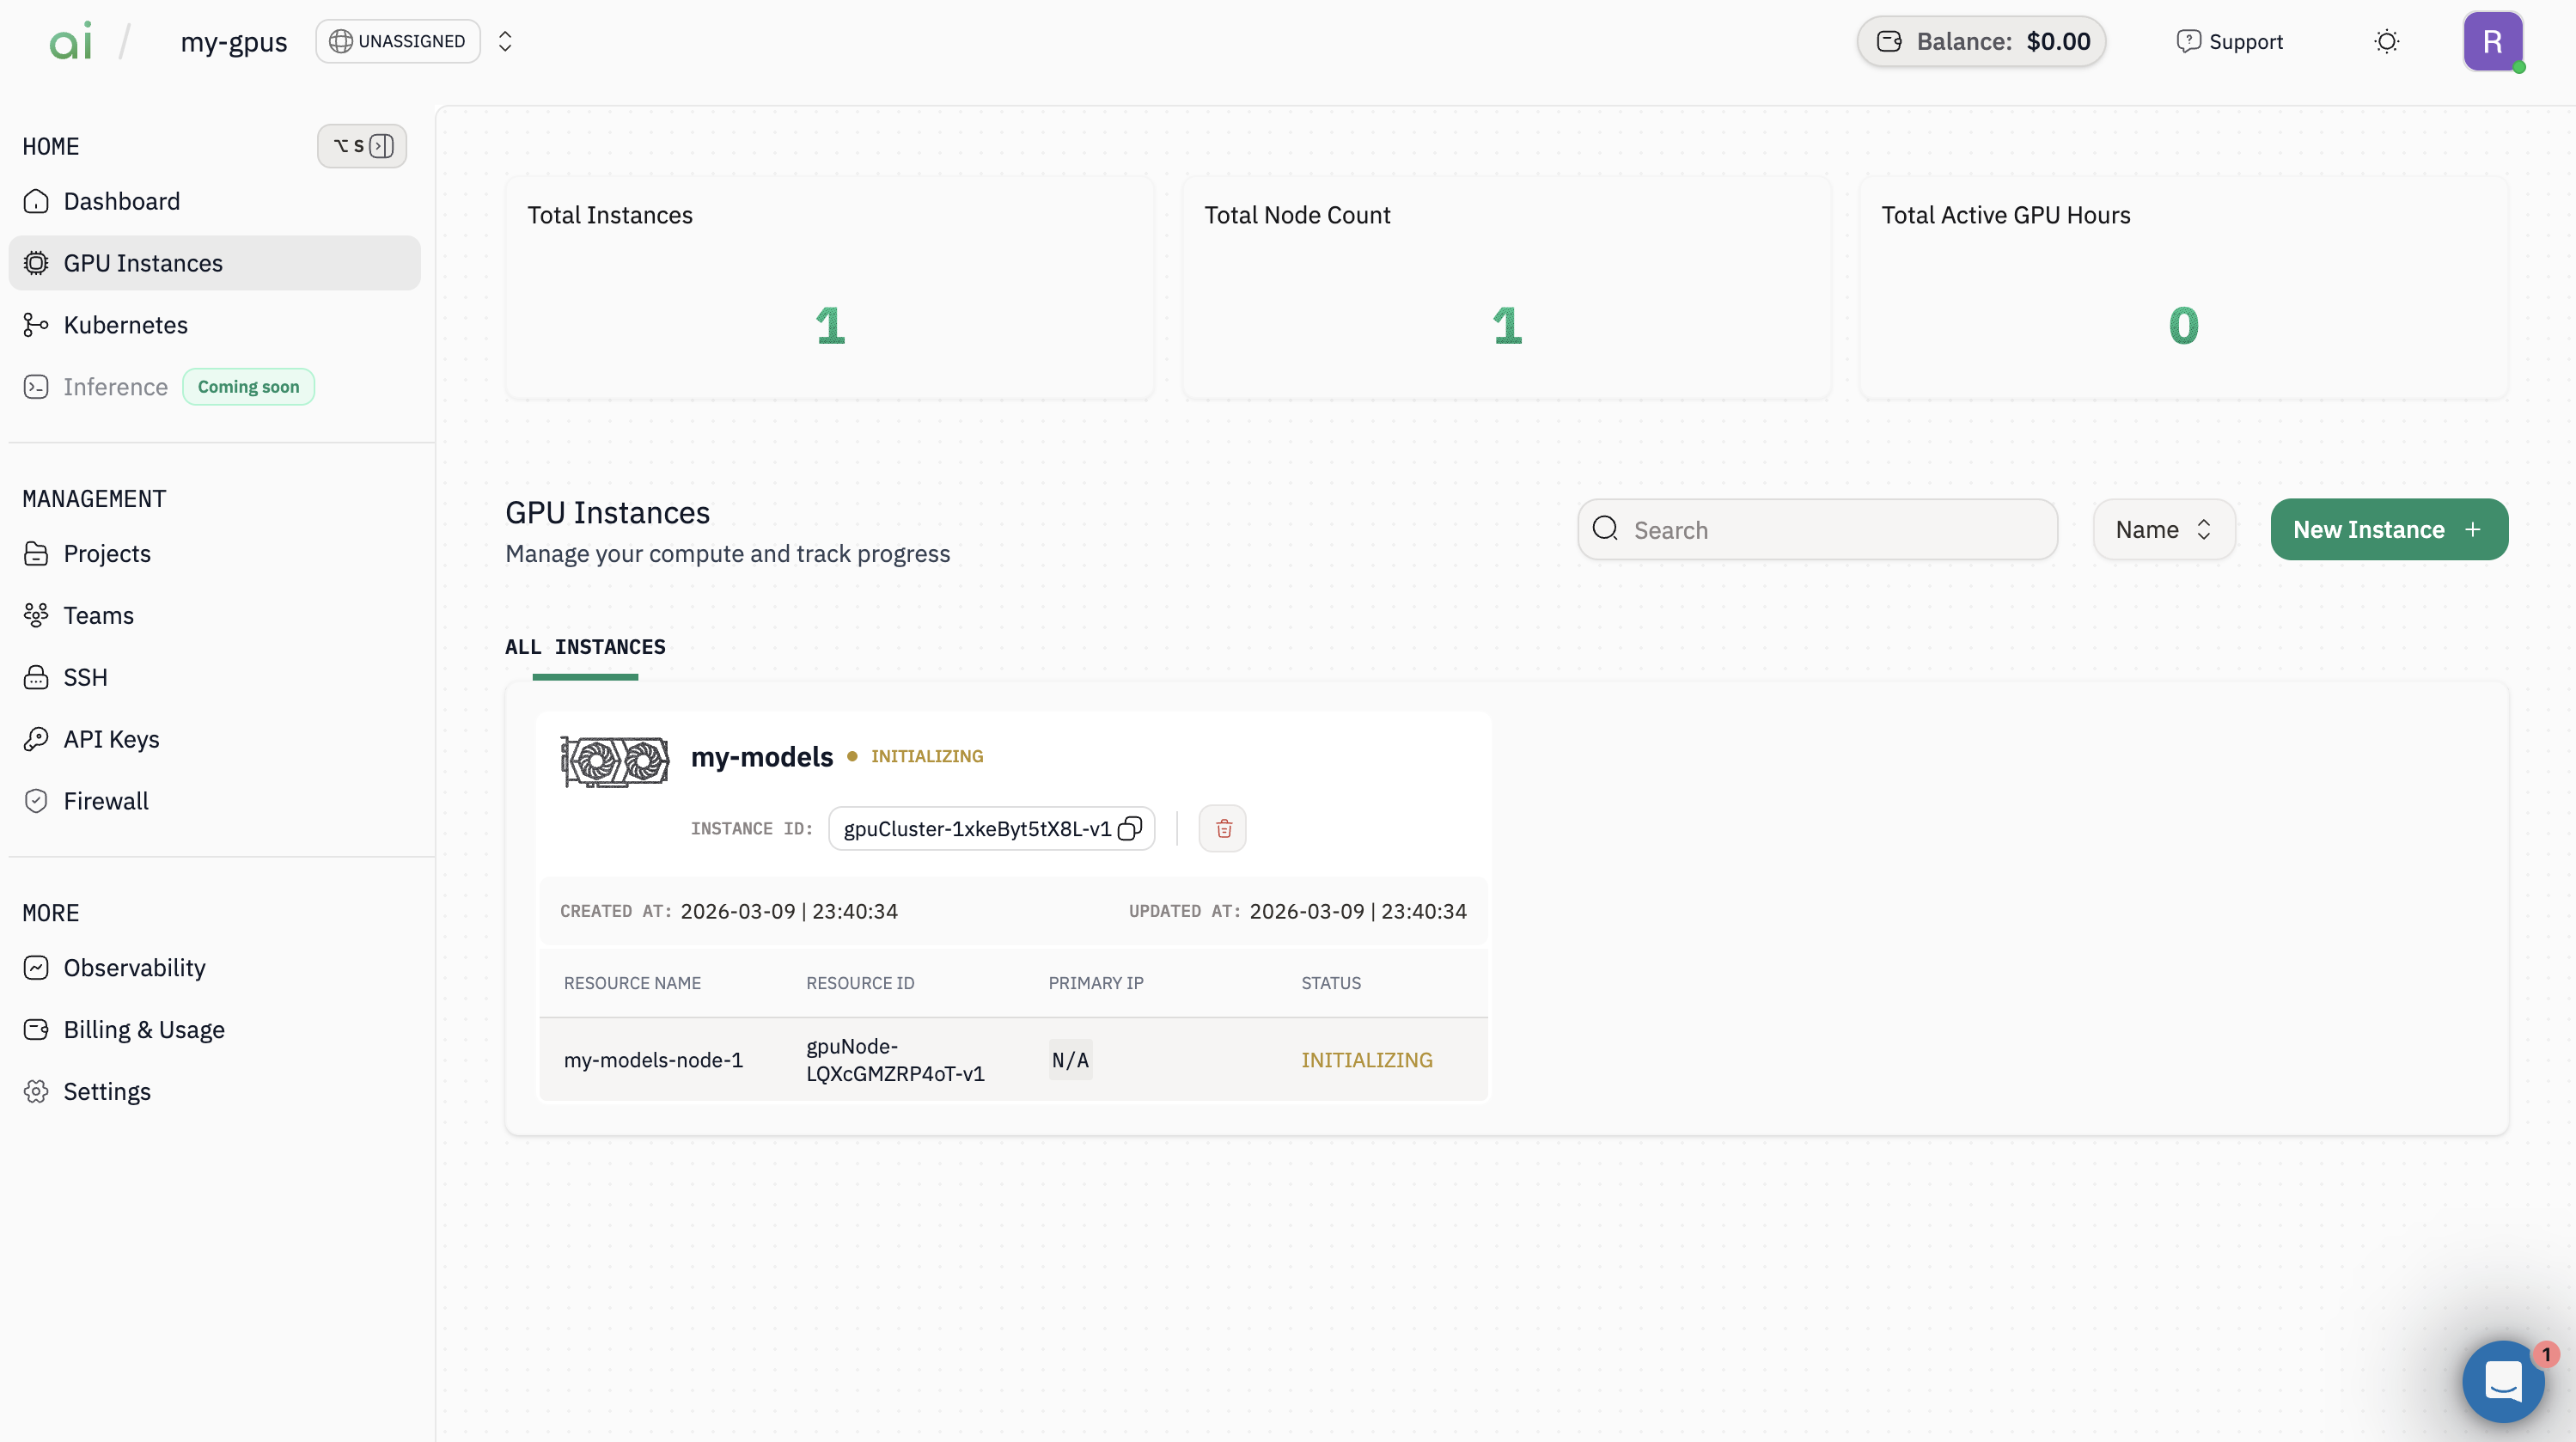
 6. Review your configuration one final time, then click the green `Launch` button in the Summary panel.
Your new instance will appear in the `GPU Instances` page, where you can monitor its status and access connection details.
6. Review your configuration one final time, then click the green `Launch` button in the Summary panel.
Your new instance will appear in the `GPU Instances` page, where you can monitor its status and access connection details.
 #### Step 4: Connect via SSH
Once your instance is running, open it from the `GPU Instances` page to view connection details.
Now to connect to the GPU instance use the following SSH command format:
```bash theme={null}
ssh -i /path/to/your/private_key @
```
Here are some Important details:
* `Private key:` Use the private key that corresponds to the public key you uploaded to AION
* `Username:` This depends on your selected image
* Ubuntu-based images typically use `ubuntu`
* Check your instance details for the correct username
**Example command:**
```bash theme={null}
ssh -i ~/.ssh/aion_key ubuntu@203.0.113.45
```
Once connected, you're ready to start running your workloads on your GPU instance!
#### Step 4: Connect via SSH
Once your instance is running, open it from the `GPU Instances` page to view connection details.
Now to connect to the GPU instance use the following SSH command format:
```bash theme={null}
ssh -i /path/to/your/private_key @
```
Here are some Important details:
* `Private key:` Use the private key that corresponds to the public key you uploaded to AION
* `Username:` This depends on your selected image
* Ubuntu-based images typically use `ubuntu`
* Check your instance details for the correct username
**Example command:**
```bash theme={null}
ssh -i ~/.ssh/aion_key ubuntu@203.0.113.45
```
Once connected, you're ready to start running your workloads on your GPU instance!