> ## Documentation Index
> Fetch the complete documentation index at: https://docs.aion.xyz/llms.txt
> Use this file to discover all available pages before exploring further.
# Create a Kubernetes Cluster on AION
> Get a GPU-backed Kubernetes cluster running on AION, retrieve the admin kubeconfig and connect kubectl.
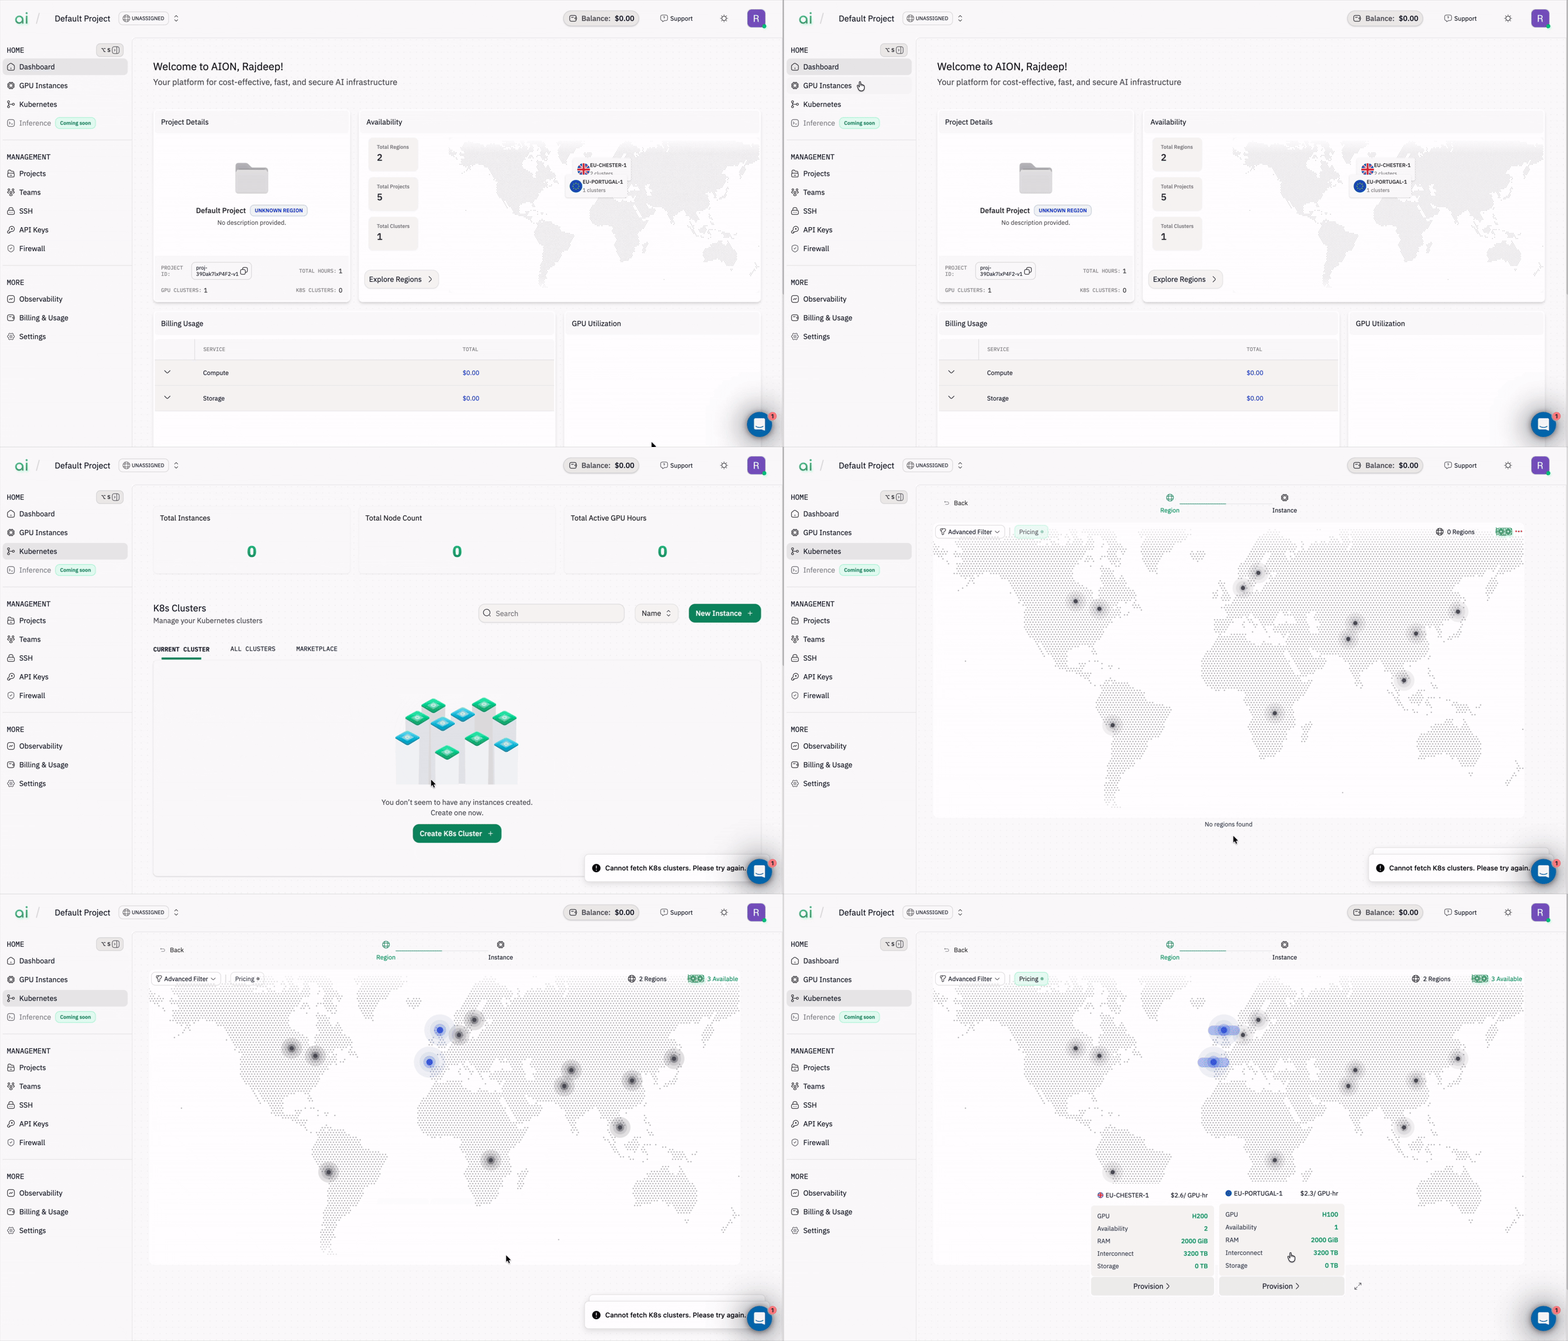
#### Step 1: Open the Kubernetes page
Start by navigating to AION and opening the Kubernetes console.
1. In the left navigation, click `Kubernetes` (under `Home`).
2. The Kubernetes page shows a world map and region cards with available GPU clusters, GPU types, and pricing.
You will see cards for each region describing GPU type, availability, RAM, interconnect and price.
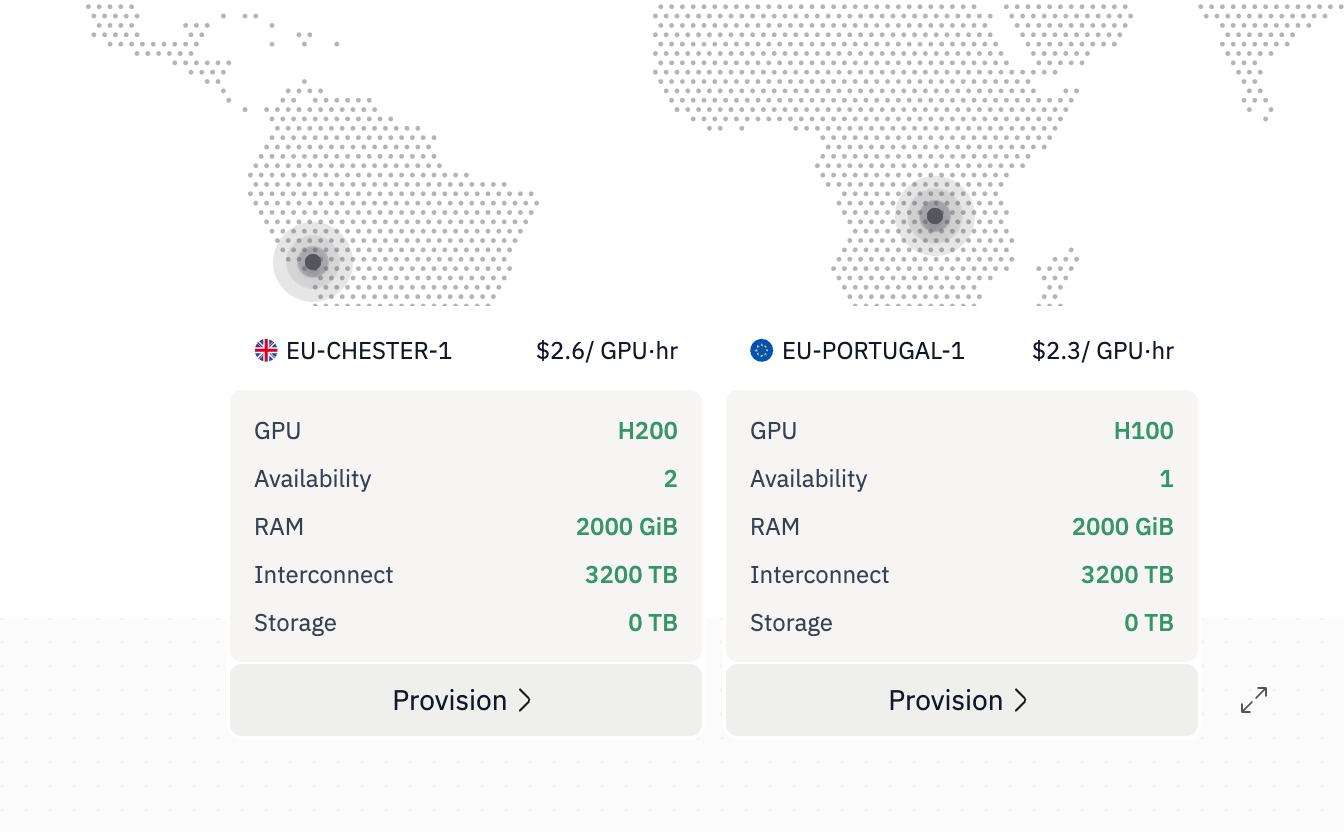
 #### Step 2: Choose a region / cluster and provision
1. Browse the available region cards and the interactive map. Each card displays:
* `GPU type` (H100, H200, etc.)
* `Availability`
* `RAM` / `Interconnect` / `Storage`
* `Price per hour`
2. Select the region / cluster that matches your GPU, memory, and price requirements.
3. Click `Provision` on the card for the region/cluster you want to deploy.
After you click `Provision`, you will move to the project selection step.
#### Step 2: Choose a region / cluster and provision
1. Browse the available region cards and the interactive map. Each card displays:
* `GPU type` (H100, H200, etc.)
* `Availability`
* `RAM` / `Interconnect` / `Storage`
* `Price per hour`
2. Select the region / cluster that matches your GPU, memory, and price requirements.
3. Click `Provision` on the card for the region/cluster you want to deploy.
After you click `Provision`, you will move to the project selection step.
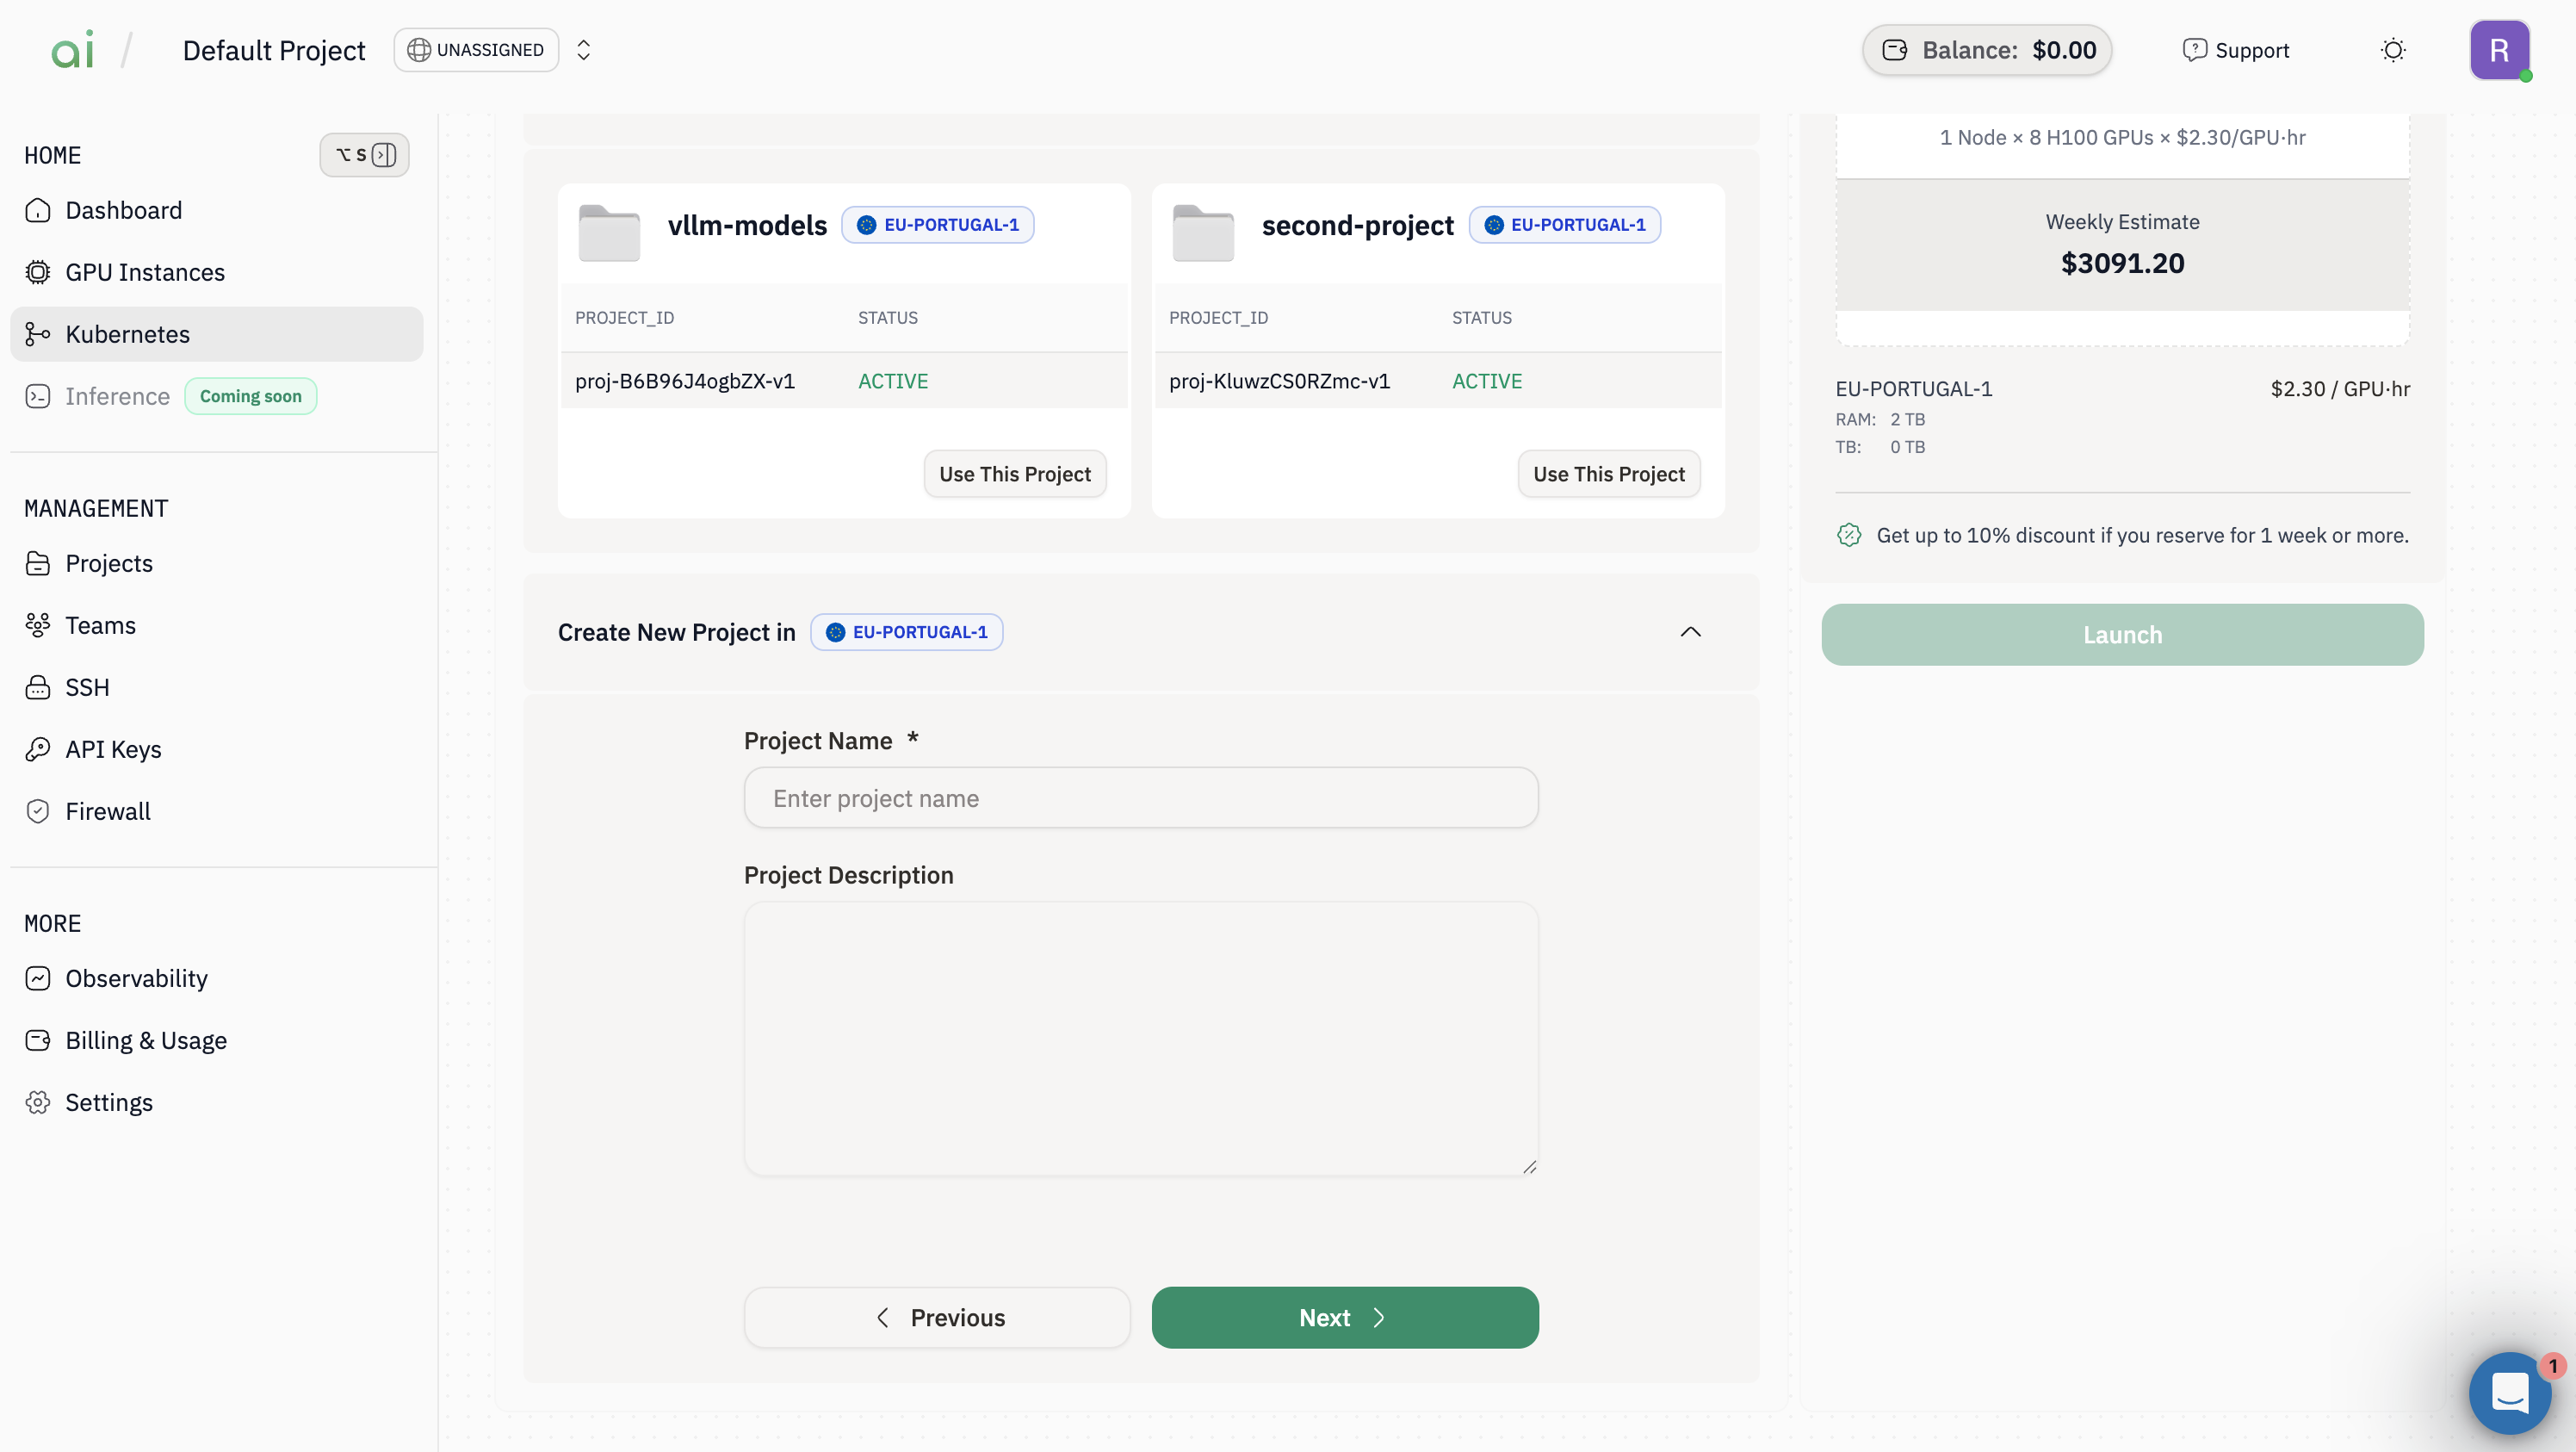
 #### Step 3: Create or select a project
You must either pick an existing project or create a new one before launching a cluster.
1. On the Project step, either choose `Existing Projects` or expand `Create New Project`.
2. If creating a new project, fill in:
* `Project Name` (required)
* `Project Description` (optional)
3. Click `Next` to proceed to the cluster configuration step.
Your project will appear in the project dropdown when creating or managing clusters.
#### Step 3: Create or select a project
You must either pick an existing project or create a new one before launching a cluster.
1. On the Project step, either choose `Existing Projects` or expand `Create New Project`.
2. If creating a new project, fill in:
* `Project Name` (required)
* `Project Description` (optional)
3. Click `Next` to proceed to the cluster configuration step.
Your project will appear in the project dropdown when creating or managing clusters.
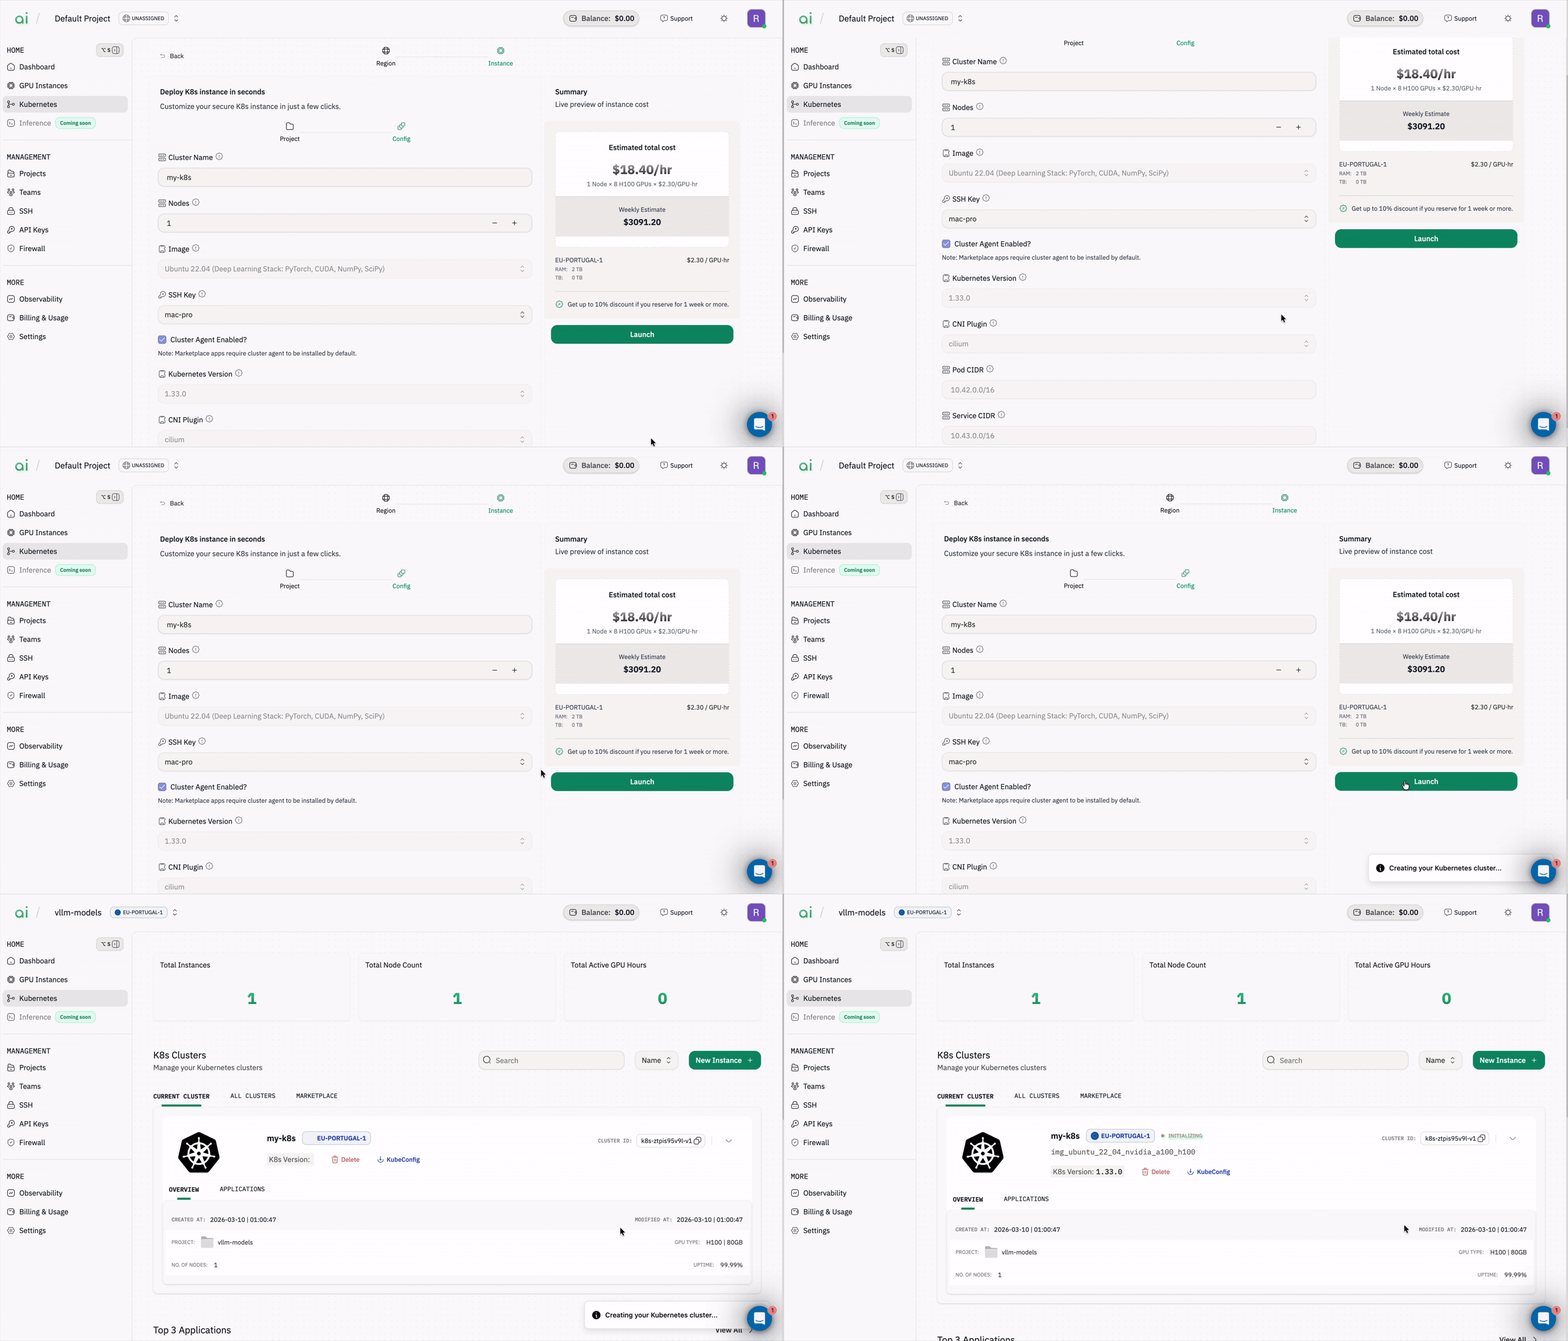
 #### Step 4: Configure the cluster and launch
Define the cluster configuration and launch it.
1. Fill the cluster configuration fields shown in the UI:
* `Cluster Name`: A friendly name such as `myfirstk8s`
* `Nodes`: Use the **– / +** controls to set the number of nodes
* `Image`: Select a base image (for deep learning stacks this may include PyTorch/CUDA)
* `SSH Key`: Select the public key you uploaded earlier
* `Kubernetes Version`: Choose the desired K8s version
* `CNI Plugin`, `Pod CIDR`, `Service CIDR` and other network fields
2. Review the **Estimated total cost** shown in the summary panel on the right.
3. Click the green `Launch` button to create the cluster.
The cluster will show a status such as `Initializing` while nodes come up.
#### Step 4: Configure the cluster and launch
Define the cluster configuration and launch it.
1. Fill the cluster configuration fields shown in the UI:
* `Cluster Name`: A friendly name such as `myfirstk8s`
* `Nodes`: Use the **– / +** controls to set the number of nodes
* `Image`: Select a base image (for deep learning stacks this may include PyTorch/CUDA)
* `SSH Key`: Select the public key you uploaded earlier
* `Kubernetes Version`: Choose the desired K8s version
* `CNI Plugin`, `Pod CIDR`, `Service CIDR` and other network fields
2. Review the **Estimated total cost** shown in the summary panel on the right.
3. Click the green `Launch` button to create the cluster.
The cluster will show a status such as `Initializing` while nodes come up.
 #### Step 5: Retrieve the Kubeconfig command
Once the cluster is created it will appear in the `Current cluster` section.
1. Open the cluster details from the Current cluster list.
2. Click `KubeConfig` (or the KubeConfig button). A dialog appears containing a command you can run from your workstation to print the admin kubeconfig.
The dialog contains a command resembling:
```bash theme={null}
ssh -o StrictHostKeyChecking=no -i ubuntu@k8s-.groundcontrol-aion.xyz sudo cat /etc/kubernetes/admin.conf
```
Click `Copy command` or copy the command manually.
> `Important:` Use the exact host and user shown in the dialog. Replace `` with the path to your private key on your workstation.
#### Step 6: Save the kubeconfig locally and connect with kubectl
Run the SSH command (copied in Step 5) locally and redirect the output to a file to save the admin kubeconfig.
```bash theme={null}
# Replace the key path and host with the values from the UI
ssh -o StrictHostKeyChecking=no -i ~/.ssh/id_rsa ubuntu@k8s-.groundcontrol-aion.xyz 'sudo cat /etc/kubernetes/admin.conf' > ~/kubeconfig.yaml
```
Now use the kubeconfig with `kubectl`:
```bash theme={null}
# Temporarily use the kubeconfig for the current shell
export KUBECONFIG=~/kubeconfig.yaml
kubectl get nodes
# Or reference directly without exporting
kubectl --kubeconfig=~/kubeconfig.yaml get nodes
```
#### Step 7: (Optional) SSH into a node
If you need to debug at the node level:
```bash theme={null}
ssh -i ~/.ssh/id_rsa ubuntu@
```
Important: Always keep your private SSH key secure. Use chmod 600 \~/.ssh/id\_rsa to set correct permissions. Do not share your private key.
#### Step 5: Retrieve the Kubeconfig command
Once the cluster is created it will appear in the `Current cluster` section.
1. Open the cluster details from the Current cluster list.
2. Click `KubeConfig` (or the KubeConfig button). A dialog appears containing a command you can run from your workstation to print the admin kubeconfig.
The dialog contains a command resembling:
```bash theme={null}
ssh -o StrictHostKeyChecking=no -i ubuntu@k8s-.groundcontrol-aion.xyz sudo cat /etc/kubernetes/admin.conf
```
Click `Copy command` or copy the command manually.
> `Important:` Use the exact host and user shown in the dialog. Replace `` with the path to your private key on your workstation.
#### Step 6: Save the kubeconfig locally and connect with kubectl
Run the SSH command (copied in Step 5) locally and redirect the output to a file to save the admin kubeconfig.
```bash theme={null}
# Replace the key path and host with the values from the UI
ssh -o StrictHostKeyChecking=no -i ~/.ssh/id_rsa ubuntu@k8s-.groundcontrol-aion.xyz 'sudo cat /etc/kubernetes/admin.conf' > ~/kubeconfig.yaml
```
Now use the kubeconfig with `kubectl`:
```bash theme={null}
# Temporarily use the kubeconfig for the current shell
export KUBECONFIG=~/kubeconfig.yaml
kubectl get nodes
# Or reference directly without exporting
kubectl --kubeconfig=~/kubeconfig.yaml get nodes
```
#### Step 7: (Optional) SSH into a node
If you need to debug at the node level:
```bash theme={null}
ssh -i ~/.ssh/id_rsa ubuntu@
```
Important: Always keep your private SSH key secure. Use chmod 600 \~/.ssh/id\_rsa to set correct permissions. Do not share your private key.